Arm training and weights go together like peanut butter and jelly. To build bigger biceps, you’ve got to do the curls. Conversely, you must do cable pushdowns and barbell skullcrushers to craft horseshoe triceps. Or do you?
With a little ingenuity, you can get an awesome arm workout with nothing but your body weight. If you find that statement hard to believe, you clearly haven’t tried the calisthenics exercises I am about to unleash in this article. Believe me; these exercises aren’t just for beginners or those who want to ‘tone’ their arms. We’re talking hardcore training here.
Why Calisthenics for Arms?
Calisthenics exercises rely on your body weight. It includes familiar moves like push-ups, pull-ups, and burpees, along with those fantastic strength-based moves you see on YouTube street workout videos. But there are hundreds of other calisthenics exercises, many designed to isolate and work your biceps, triceps, and forearms.
Benefits of Calisthenics Training
Here are nine reasons to employ bodyweight exercises in your workouts:
- Equipment Free: Although you may need a pull-up bar or chair for some moves, calisthenics exercises are 99% equipment free. That means you can do your workout anywhere, anytime. Whether you’re at home, on vacation, or just down at the local park, you can bust out a calisthenics workout at will.
- Builds Functional Strength: Bodyweight exercises usually simulate real-life movements. As such, they promote functional strength and engage multiple muscle groups. Pull-ups, push-ups, and dips are a few examples.
- Balanced Development: Calisthenics training delivers balanced development and promotes symmetrical strength and muscle development by working multiple muscle groups simultaneously.
- Enhanced Body Control: Many bodyweight exercises require stabilizing and controlling your body while doing the movement. This improves your bodily control or proprioception.
- Progressive Resistance: Progressive resistance is more challenging with calisthenics than weight resistance. But it still can be done by adjusting the angle of your body or adapting the intensity of the exercise. This ensures that your muscles will receive sufficient stress to continue adapting.
- Variety: As you’re about to discover, there are a lot of options when it comes to calisthenics arm training. Whether you decide to interchange your body calisthenics arm workouts with resistance training or train them exclusively with your body weight, you will have plenty of options to keep your training fresh and interesting.
- Builds Muscular Endurance: Many calisthenics exercises, such as push-ups, can be performed for high reps and multiple sets with minimal rest between them. This develops muscular endurance, allowing your muscles to work harder for longer.
- Reduced Injury Risk: Calisthenics workouts have lower injury rates than resistance training. That’s because there is less stress on the joints, and you are less likely to overload a muscle with a weight you can’t handle, leading to bad form and injury.
- Convenience and Time Efficiency: Body weight workouts are time efficient, allowing you to move quickly from one exercise to the next; no need to set up weights, and you don’t have to wait around for equipment during the rush hour at the gym. You also don’t have to factor in commuting to and from the gym.
Biceps Calisthenics Exercises
One of the biggest challenges with home bodyweight training is effectively working your biceps. When working that muscle group, everything comes down to a variation of the curl. When using weights, you have several options, including a barbell, dumbbell, cable, and preacher benches. But what about when you are only using your body weight?
Here are seven calisthenics curl exercises you can do at home with a towel, a door, a bench ledge, and a pull-up bar.
1. Towel Curls
Towel curls require getting used to. In effect, your body will fight against itself — legs against biceps. Your legs, of course, are far stronger than your biceps. When you are pulling up on the towel, think about pulling it as hard as you can as if you were going to rip it.
Step-by-Step Guide:
- Stand with your back against a wall for balance. Then, holding each end of a regular-sized bath towel, raise one leg just enough to loop the towel under your foot.
- Use your leg to resist your arms as you pull up on the towel. This should be at the point where your forearms are at about a 30-degree angle to your upper body.
- Lower under control and repeat for the required rep count. Then do the same on the other leg.
Training Tips:
- This curl variation is more effective if you use a slow rep tempo. The movement should take five seconds to come up. Take another five seconds to do the eccentric part of the curl, applying more pressure to the towel with your foot.
- The only part of your arms to move should be your forearms, with your elbows fixed at your sides and your upper arms perpendicular to the floor.
- If you do the exercise strictly and slowly, you only need five reps per set for maximum effect.
2. Ledge Curls
Step-by-Step Guide:
- Stand with your feet shoulder-width apart in front of anything horizontal about waist height, stable and fixed that you can fit your hands under. A kitchen bench, staircase railing, or strong shelve will suffice. Just be sure that the object will not budge.
- Put your open hands, palms up, under the protruding surface. Your arms should be straight (you may have to lean back slightly to achieve this).
- Try to pull the object up and rip it out of its fixed position. Of course, it will not move, but don’t let that stop you.
- As you pull up, slowly bend forward at the waist, keeping your back straight, only bending at the waist and elbows until your chest or chin touches the thing you’re pulling against.
- Slowly reverse the motion, leaning back until you are standing up straight again.
Training Tips:
- Be sure to keep your elbows pinned at the side of your body. Only your hips and elbows should bend.
- Never stop pulling with your arms; instead, go right into another rep.
- Each positive and negative rep should be as slow as when you did the towel curls.
3. Isometric Curls
Unlike most biceps exercises, isometric curls involve holding a static position to place maximum tension on the biceps. This is a great move to do during your rest between sets on other bodyweight biceps exercises.
Step-by-Step Guide:
- Stand upright with your feet shoulder-width apart, shoulder down, and chest up.
- Grasp the wrist of your working arm with your other hand and push down on it so hard that you can barely raise your arm as you would with any other kind of curl. You will be pushing down with the triceps of one arm to work against the biceps of the other arm.
- Hold the isometric contraction for 30 seconds.
Training Tips:
- To progress this exercise, increase your hold time.
- Maintain a straight back to avoid leaning forward as you do the exercise.
- For best results, superset isometric curls with a dynamic movement like close grip pull-ups or towel curls.
https://www.youtube.com/watch?v=LbAJgdslxCM
4. Bicep Push-Ups
The biceps have minimal involvement in regular push-ups, with the triceps doing most of the work. However, by adjusting your hand position so your fingers are facing backward, you can shift the emphasis to the biceps. The further you move your hands down your body, the more work your biceps will have to do.
Step-by-Step Guide:
- Get into the start position of a push-up with your hands reversed so that your fingers are pointing back toward your toes. Your hands should be at shoulder level and close to your body.
- Lower yourself down to the ground and push back up. Attempt to go all the way down until your chest touches the floor. Keep your body in a straight line throughout, not allowing your butt to lift or sag. Do not allow your elbows to splay out. Breathe in as you lower your body, with a sharp exhale as you push up.
Training Tips:
- Keep your elbows tucked into your sides throughout the exercise.
- Perform your reps in a slow, controlled manner.
- Move through a full range of motion, going all the way down until to the floor and up to full biceps extension.
- Pause in the bottom position for a second to keep tension on the biceps.
5. Upright Towel Curls
Here’s a variation of the towel curl that provides a unique horizontal angle of movement. For this one, you’ll need a secure pole like a washing line pole or fence post to wrap the towel around.
Step-by-Step Guide:
- Hook the towel around an object so that you can grab both ends of the towel at your eye level.
- Stand about 18 inches away from the upright, facing it, and grab the ends of the towel with a neutral grip (palms facing each other).
- Curl your arm so that your forearms come to the sides of your head.
- Hold the contracted position for a count of two and then slowly return to the start position.
Training Tips:
- Your feet should be shoulder-width apart and have your knees slightly bent to produce a secure, anchored position.
- Your shoulder should remain relaxed and down throughout the exercise, with your shoulder blades retracted. This will help keep the delts out of the movement while keeping your upper body stable and balanced.
- Keep your elbows close to your body; do not let them flare out.
6. Close-Grip Chin-Ups
This exercise requires a pull-up bar. You can use an overhead beam in your garage or basement if you don’t have one. Alternatively, you can pick up a quality doorway pull-up bar for less than fifty dollars.
Step-by-Step Guide:
- Stand below a pull-up bar and reach up to grab it with an underhand (supinated) grip. Your pinkies should be about six inches apart.
- Hang from the bar and curl your body slightly, with your knees bent and lower back rounded. Pull your shoulder blades down and back.
- Pull your body up to the bar, focusing on pulling with your biceps rather than your lats. Come up until your chin touches the bar.
- Squeeze your biceps as tightly as possible for a two-second count.
- Lower under control to the start position.
Training Tips:
- To make the exercise harder, bring your hands closer together.
- Keep your shoulder blades retracted throughout the entire movement.
- Use a full range of motion, coming up to the bar and extending down to full arm extension on every rep.
- Do not allow your body to swing.
7. Close-Grip Chin-Up Hold
This is an excellent finisher that will eke out the last bit of strength from your biceps. With this one, you simply come up to the top position of the chin-up and hold for a set length of time.
With the close-grip chin-up hold at the end of your exercise, you won’t be able to hold the top position for very long. Fight it all the way when you start to drop. When you can no longer support yourself, you have reached the point of muscular failure.
Calisthenics Biceps Workout
This home bodyweight bicep workout is designed to create maximum intensity on the biceps in the shortest possible time to produce the biggest bang for your buck. Allow yourself no more than 30 seconds to rest between sets. Move directly from one exercise to the next.
When it comes to the close grip chin-up, keep going until you cannot perform another rep. On your last exercise, the chin-up hold, try to extend your hold time by five seconds on every workout.
| # | Exercise | Sets x Reps/Duration |
|---|---|---|
| 1 | Towel Curls | 3 x 5 reps |
| 2 | Ledge Curls | 3 x 5 reps |
| 3 | Isometric Curls | 3 x 30 seconds (each arm) |
| 4 | Close-Grip Chin-Ups | 2 x Failure |
| 5 | Close-Grip Chin-Up Hold | 30 seconds hold |
Triceps Calisthenics Exercises
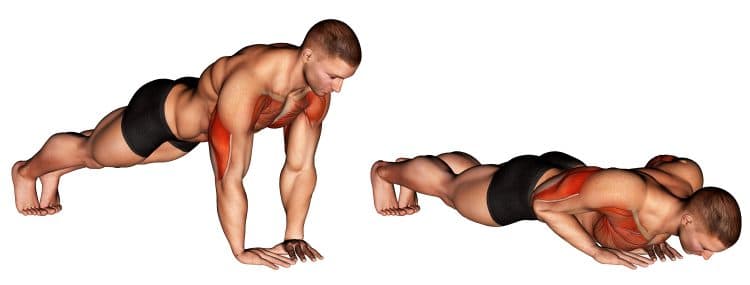
Every time you push your body away from the floor or a wall, you are working your triceps. That’s why you’ll see several push-up variations in the following exercises. While the push-up is primarily a pectoral exercise, you can de-emphasize the pecs and bias the triceps by bringing your hands closer together.
Another fantastic body-weight triceps exercise is the dip. Ideally, it should be done on a dip bar. If you don’t have one, you can use the corner of a kitchen bench or set up two chairs together. Make sure that the chairs are both weighted down.
Let’s now check out the six best calisthenics exercises for the triceps:
1. Diamond Push-Up
The diamond push-up, also known as the triangle push-up, is more challenging than the standard push-up. That’s because it involves placing your hands together under your body, switching the main emphasis from the pectorals to the triceps.
Step-by-Step Guide:
- Get down in the standard push-up position, but with your hands together under your body so that your thumbs and index fingers are touching. The gap between your hands will form a diamond shape.
- Maintaining a tight core and a straight line from head to toe, lower to the floor until your arms are fully extended.
- Push back to the start position.
Training Tips:
- The ideal hand placement for the diamond push-up is with the hands directly under the deltoids. If they are beyond that, there will be excessive stress on the shoulder joint, and the exercise’s emphasis will transfer from the triceps to the front delt.
- Keep your elbows as close to your torso when doing any triceps exercise. This keeps the emphasis on the triceps. Ensure your elbows don’t flare out during concentrics.
- Lifting or lowering the hips is a common mistake with all versions of the push-up. However, you will strain your lumbar spine excessively unless you maintain your body in a straight line. In addition, you won’t be able to adequately engage the core and upper leg muscles to provide the stability and support you need to perform the exercise correctly. Maintain your body in a straight line by engaging the core, glutes, and quads.

2. Triceps Dips
You can do dips to target either the pectorals or the triceps. The difference is that you angle your body forward when doing the chest dip. In contrast, the triceps version should see your body moving in a more vertical plane, straight up and down.
Step-by-Step Guide:
- Stand in the middle of a dip bar. Ensure the surfaces or bars are stable and can hold your body weight.
- With your palms down, place your hands on the bars and lift and cross your legs behind you.
- Bend your elbows to bring your body straight down. Do not allow your elbows to flare. Lower your body till your shoulders are below your elbows.
- Return to the starting position by extending your elbows. To keep tension in your triceps, fully extend your arms, but don’t lock out your elbows.
- Repeat for the required rep count.
Training Tips:
- Keep your shoulders back and your chest high throughout the entire movement.
- Maintain a tight core to keep your body stable.
3. Reverse Dips
Reverse dips, also known as bench dips, can be done using either a bench or a chair.
Step-by-Step Guide:
- Place a chair or bench behind you. Position your hands on the edge of the bench or chair with your thumbs about six inches apart. Position your legs in front of you.
- Bend your elbows to lower your body. Keep your elbows close to your side as you descend. Continue until your butt almost touches the floor.
- Push through your triceps to return to the starting position. To keep tension in your triceps, fully extend your arms, but don’t lock out your elbows.
Training Tips:
- Keep your shoulders back, chest up, and core active to maintain stability.
- Use a full range of motion. During eccentrics, lower your body until your elbows are at a 90-degree angle or just below, and then fully extend your arms.
- Avoid using momentum to bias your triceps.
4. Pike Push-Ups
Pike push-ups focus mainly on the front (anterior) deltoids, which control shoulder flexion. However, they also engage your triceps, which help extend the elbow during the concentric phase. During this exercise, the triceps are crucial for supporting the shoulders and stabilizing the arms.
Step-by-Step Guide:
- Get in a standard push-up position, with your hands at shoulder-width and your body forming a straight line from head to toe.
- Walk your feet in as you raise your hips toward the ceiling. Stop when your body forms an inverted ‘V.’
- Drop your head to the floor, bending your elbows and contracting your triceps. Get as low to the floor as you can.
- Push back to the start position, concentrating on pushing through the triceps.
Training Tips:
- Don’t arch or droop your back as you perform this exercise.
- Do the exercise in a slow and controlled manner, eliminating momentum.
- Perform this exercise in the end in a superset or tri-set. Other exercises to pair it with include diamond push-ups and tricep dips.
5. Triceps Push-Ups
The triceps push-up involve placing your hands closer together than a regular push-up but not as close as the diamond push-up. As a result, this is a less intense triceps exercise than the diamond version.
Step-by-Step Guide:
- Start in the high plank position, with your hands directly beneath your shoulders and your body in a straight line.
- Keeping your elbows in at your sides, lower your chest to the floor.
- Push through the triceps to return to the start position.
Training Tips:
- To keep tension in your triceps, fully extend your arms, but don’t lock out your elbows in the top position.
- Keep a tight core throughout the movement.
- Maintain a straight line from head to toe, not allowing your hips to rise or droop.
- Perform the exercise slowly and deliberately.
6. Diamond Handstand Push-Ups
The diamond handstand push-up is more challenging than the standard diamond or handstand push-up. It involves placing your feet up a wall. The higher up the wall your feet are, the harder the exercise will be.
Step-by-Step Guide:
- Stand with your back against the wall. Bend down to place your hands on the floor as you proceed to walk your feet up the wall. Go up as far as you feel comfortable.
- Bring your hands together to form a diamond shape, with your index fingers and thumbs touching.
- Begin the movement by lowering your head with the goal of touching your head to your hands.
- Push through the triceps to return to the start position.
Training Tips:
- Before trying diamond handstand push-ups, perfect ordinary handstand push-ups.
- Pike push-ups are a preliminary exercise that leads to diamond handstand push-ups. When you perform a pike push-up, your torso is at a 45-degree angle, akin to being in a handstand.
- Have a spotter or trainer assist you to ensure safety and proper technique when performing diamond handstand push-ups.
- Maintaining a tight core during the exercise will stabilize your body and improve your balance.
Calisthenics Triceps Workout
Perform this triceps workout directly after working your biceps. You will perform more reps on most exercises but follow the same rapid-fire tempo, with just 30 seconds between exercises. Each exercise is slightly less challenging than the last, factoring in the fatigue factor.
| # | Exercise | Sets x Reps |
|---|---|---|
| 1 | Triceps Dips | 3 x 10-12 reps |
| 2 | Diamond Push-Ups | 3 x 8 reps |
| 3 | Triceps Push-Ups | 2 x 8 reps |
| 4 | Reverse Dips | 2 x 10 reps |
Forearm Calisthenics Exercises
Training your arms isn’t just about the biceps and triceps. Unless you work on developing your forearms, your arms will be lacking. Here are three fantastic bodyweight forearm exercises to complete your calisthenics arm workout. You’ll need a chair for the first two of them.
1. Forearm 30-Second Iso-Hold
This isometric hold will challenge your forearm and grip ability. Squeeze the chair legs as tightly as possible for maximum benefit.
Step-by-Step Guide:
- Lie face down on the floor facing a chair with your arms fully extended. Grab the bottom of a chair’s leg with each hand.
- Keeping your elbows on the ground, use forearm strength to lift the chair off the ground. Ensure the forearms are doing all of the work.
- Hold this position for 30-40 seconds.
2. Forearm Twist
This chair forearm exercise is even more intense than the last. It involves twisting a chair while holding the bottom of the legs.
Step-by-Step Guide:
- Lie face down on the floor facing a chair with your arms fully extended. Grab the bottom of a chair’s leg with each hand.
- Keeping your elbows on the ground, use forearm strength to lift the chair off the ground.
- In the top position, twist your wrists away from you to tilt the chair away. Immediately turn your wrists back toward you to tilt the chair back. Continue this twisting motion for 30 seconds. Be sure to keep your elbows on the floor throughout.
3. Fingertip Push-Up
By doing push-ups on your fingertips, you challenge your forearms and grip far more than when your hands are flat on the floor.
Step-by-Step Guide:
- Get down in a high push-up position with your hands under your shoulders. Now rise onto your fingertips.
- Perform push-ups normally.
Calisthenics Forearm Workout
Perform this forearm workout after working your biceps and triceps. The previous exercises will already have stressed your forearms to a certain extent, so you probably won’t be able to do a lot of reps on the fingertip push-ups.
| # | Exercise | Sets x Duration/Reps |
|---|---|---|
| 1 | Forearm 30-Second Iso-Hold | 2 x 30-second hold |
| 2 | Forearm Twist | 2 x 30-second twist |
| 3 | Fingertip Push-Up | 2 x failure |
More on Calisthenics:
- The 11 Best FREE Calisthenics Programs
- Best Calisthenics Triceps Exercises
- The 12 Best Calisthenics Biceps Exercises and Workout
- Calisthenic Shoulder Exercises and Workout
- The Best Calisthenic Leg Workout
- A Routine for Daily Calisthenics Training
- Weighted Calisthenics Best Exercises and Workouts
- Calisthenics Back Workout for Size and Strength
- Savage Calisthenics Abs Workouts For Beast Gains (All Levels)
- Calisthenics Workout Plan: A Beginner’s Guide
Wrapping Up
There you have it — a serious 12-exercise arm-blasting bodyweight workout you can do anywhere, anytime. If you thought that calisthenics could never give you a challenging arm workout, try this one. It might just make you a believer!
I recommend performing this arm workout twice weekly, with at least 48 hours of rest between sessions. You can also alternate between calisthenics and a resistance arm workout. Remember, consistency and progressive overload are the ultimate keys to loading your guns. Follow these principles, and you’ll be on your way to building sleeve-ripping pythons.


