



The bent over row, also called the barbell row, is a pull performed from a hip hinge. You bend forward with a flat back, let a loaded barbell hang from straight arms and row it to your torso. It trains the lats, the middle of the back and the rear of the shoulders together, while your lower back and hips hold you in position.
Nothing supports your torso, so the lift is harder to learn than a cable or machine row, and the weight you can use depends on how well you hold the hinge. In return, a single barbell exercise trains your back from the shoulders to the hips.
How to Do the Bent Over Row

- Stand over the bar and take your grip. Set your feet hip-width apart with the bar over the middle of your feet. Bend down and grip it overhand, with your hands slightly wider than shoulder width. You should feel your weight spread across the whole of each foot. Do not set up with the bar out in front of your toes.
- Lift the bar and hinge forward. Stand up with the bar, then unlock your knees, push your hips back and lower your chest until your torso is between 45 degrees and parallel to the floor. Let the bar hang from straight arms, just below your knees. You should feel your hamstrings tighten. Do not get into position by rounding your back.
- Brace and set your spine. Take a breath into your stomach, tighten your abs and lift your chest so your back is flat from hips to head. Look at the floor a few feet ahead of you. You should feel your lower back locked in place. Do not crane your neck up to watch the mirror.
- Row the bar to your stomach. Drive your elbows back and up, keeping the bar close to your thighs, until it touches your body between your lower ribs and your navel. You should feel the pull across your back and behind your shoulders. Do not let your chest rise as the bar comes up.
- Squeeze your shoulder blades together. Hold the bar against your body for 1 second. You should feel the muscles between your shoulder blades bunch up. Do not shrug your shoulders toward your ears.
- Lower under control. Take about 2 seconds to straighten your arms, and let your shoulder blades spread apart at the bottom. Breathe out, take a fresh breath, brace again and start the next rep. Do not drop the bar or let your back soften on the way down.
Muscles Worked in the Bent Over Row

The row is a pull at the shoulders and a hold at the hips. Some muscles move the bar, and others keep your body still while it moves.
Latissimus Dorsi
The lats are the largest muscles of the back. They run from the lower spine and pelvis to the upper arm, and they pull the upper arm down and back toward the torso, which is the main action of the row. The teres major, a small muscle at the back of the armpit, works with them. Keeping your elbows close to your sides and pulling the bar toward your waist gives them the longest path to work through.
Trapezius and Rhomboids
The middle and lower trapezius, and the rhomboids underneath them, pull the shoulder blades together. They finish each rep, when the bar reaches your body and your shoulder blades squeeze toward the spine. These muscles give the upper back its thickness.
Rear Deltoids
The rear deltoid, on the back of the shoulder, pulls the upper arm backward. The infraspinatus and teres minor, two small rotator cuff muscles on the shoulder blade, assist it and keep the joint centered. A wider grip with the elbows held away from the body tends to move more of the work to this group.
Biceps and Forearms
The biceps, the brachialis and the brachioradialis bend the elbow as the bar comes up, and the forearm flexors hold your grip. They assist the back and should not lead the pull. An underhand grip puts the biceps in a stronger position. For how the two grips compare, see our guide to overhand vs underhand barbell rows.
Lower Back, Glutes and Hamstrings
The spinal erectors keep your back flat, and the glutes and hamstrings hold the hinge. None of them move during the rep. They work by holding still under load, which is why your lower back can tire before your arms do.
Benefits of the Bent Over Row
Barbell rows have been part of strength and bodybuilding programs for decades, for four reasons.
Trains the Whole Back in One Lift
The bent over row works the lats, the traps, the rhomboids, the rear deltoids and the spinal erectors at the same time. A University of Waterloo study compared three rowing exercises in seven men. The inverted row worked the lats and upper back harder, but the bent over row worked the back evenly from top to bottom, lower back included (Fenwick et al., 2009).
Builds a Stronger Hinge
You hold a loaded hip hinge for the whole set, so your lower back, glutes and hamstrings train alongside your upper back. In the same study, the bent over row produced the highest spine stiffness of the three rows tested, a sign that the trunk muscles were working hard to hold the spine still. You pass through the same position in a barbell deadlift, so the two lifts practice the same skill.
Balances Your Pressing
The row is the opposite movement to the bench press: a horizontal pull in place of a horizontal push. Many programs match each pressing exercise with a row for this reason, so the muscles on the back of the shoulders get as much work as the ones on the front.
Easy to Load and Progress
All you need is a barbell and plates. You can add weight in small steps, as little as 5 pounds at a time, which makes progress simple to plan and to track.
The trade-off is the load on your lower back. Of the three rows in that study, the bent over row loaded the lower spine the most and the inverted row the least. For a healthy lifter with good form, that load is part of the training. If your lower back is sore or recovering from an injury, choose a row that asks less of it: the inverted row, or a chest-supported lift such as the seal row, where a bench holds your torso up.
Common Bent Over Row Mistakes
Rounding the Lower Back
The lower back curves as the set goes on, usually because the weight is too heavy or your hamstrings are too tight for the torso angle you chose. The spinal erectors can only do their job while the back is flat. Raise your torso a little, reduce the weight and end the set when you can no longer hold a flat back.
Standing Up as You Pull
The chest rises a little more with every rep until the lift looks like a shrug. A higher torso shortens the pull, so the weight feels lighter and the upper traps take over. Pick a torso angle before the first rep and keep it until the last. If it changes, the bar is too heavy.
Using Your Hips to Start the Bar
A quick dip and bounce through the knees and hips throws the bar upward. Momentum then does the work your back should be doing. Start every rep from still, straight arms. If you need a bounce to move the bar, end the set.
Curling the Bar With Your Arms
The wrists bend, the elbows stay low and the biceps do the pulling. Your arms tire before your back gets enough work. Think of your hands as hooks and lead with your elbows, driving them toward the ceiling behind you.
Cutting the Range Short
The bar stops a few inches from your body, or your arms never fully straighten at the bottom. You miss the squeeze at the top, where the shoulder blades come together, and the stretch at the bottom. Use a weight you can touch to your stomach on every rep, and let your shoulder blades spread before the next pull.
Bent Over Row Variations
Each of these changes one thing: the grip, the starting position or the equipment.
Underhand Bent Over Row
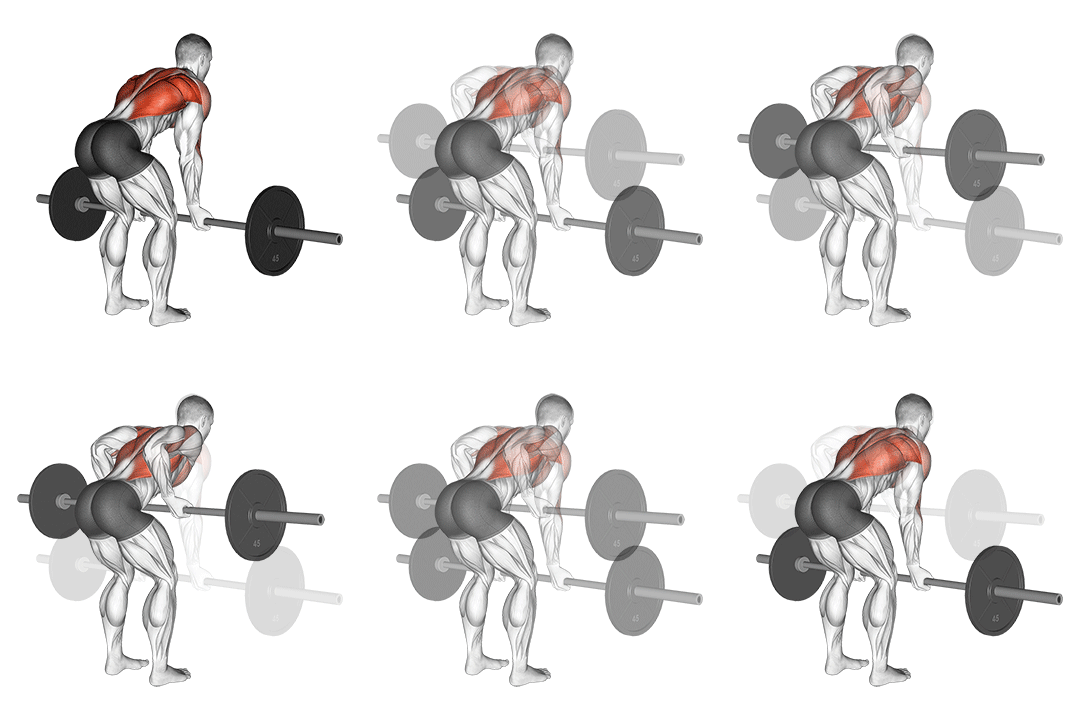
Turn your palms to face forward and take a shoulder-width grip. Your elbows stay closer to your sides, and your biceps are in a stronger position to help. Our reverse grip row guide covers the full technique.
Pendlay Row
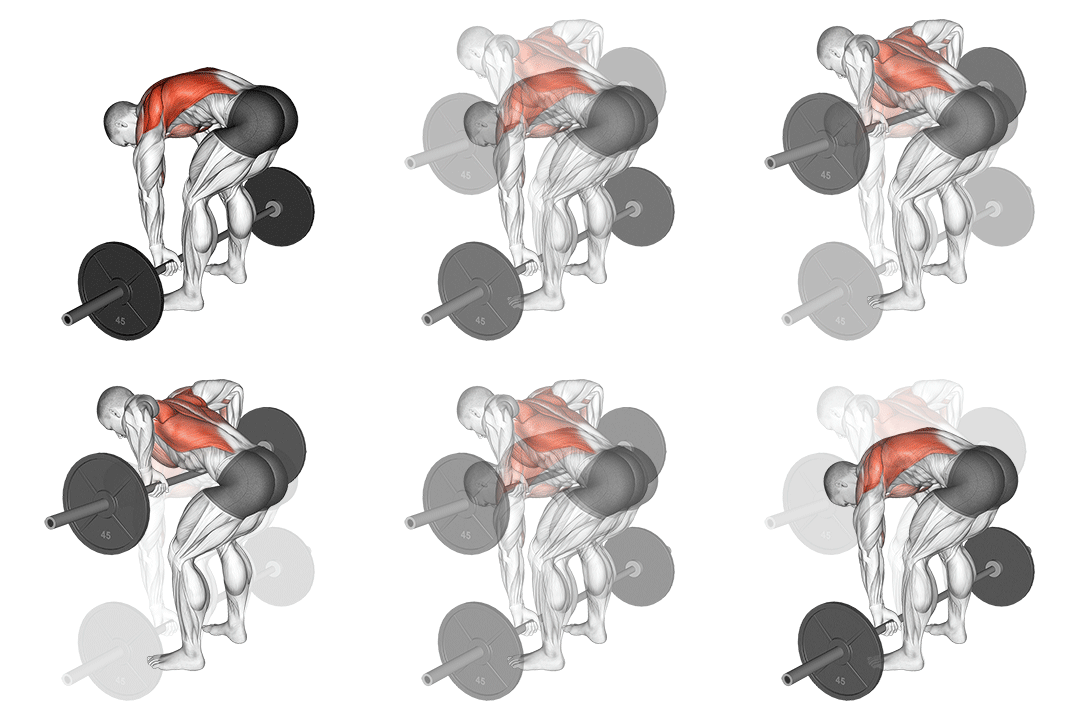
Every rep starts with the bar resting on the floor and your torso parallel to it. Starting from a dead stop removes momentum and gives your lower back a brief rest between reps. The Pendlay row suits lifters who want every rep to be strict.
Dumbbell Bent Over Row
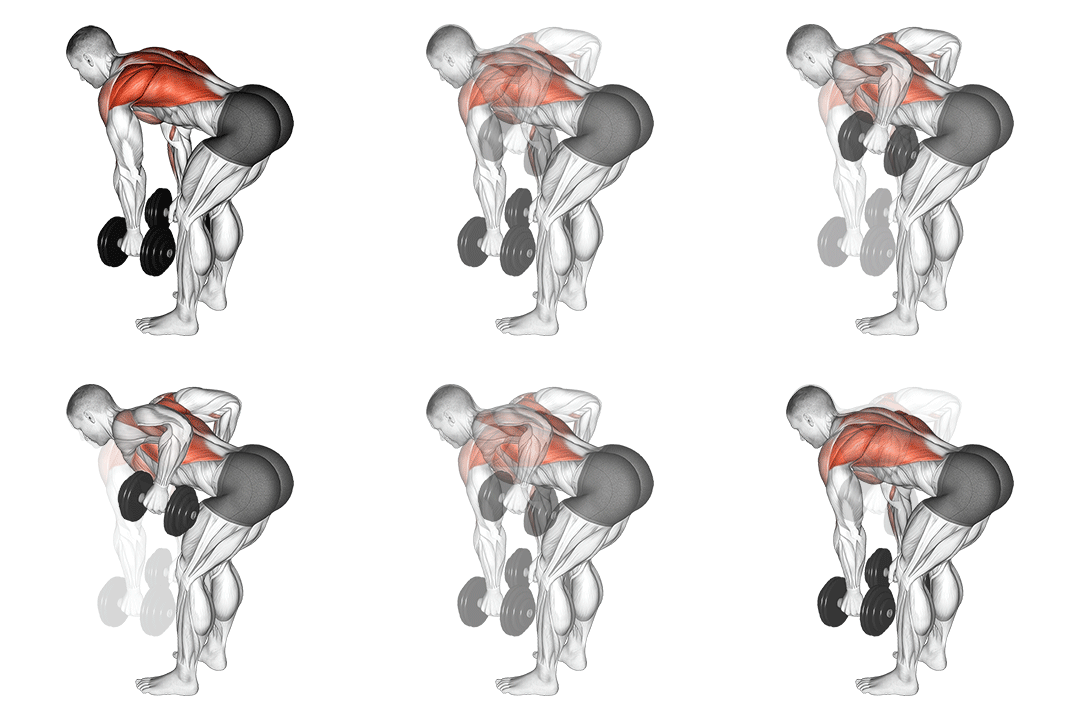
Two dumbbells replace the bar, so each arm works on its own and your wrists are free to turn. The weights can travel past your torso for a longer pull, and any difference between your two sides shows up quickly. Technique is covered in our bent over dumbbell row guide.
T-Bar Row
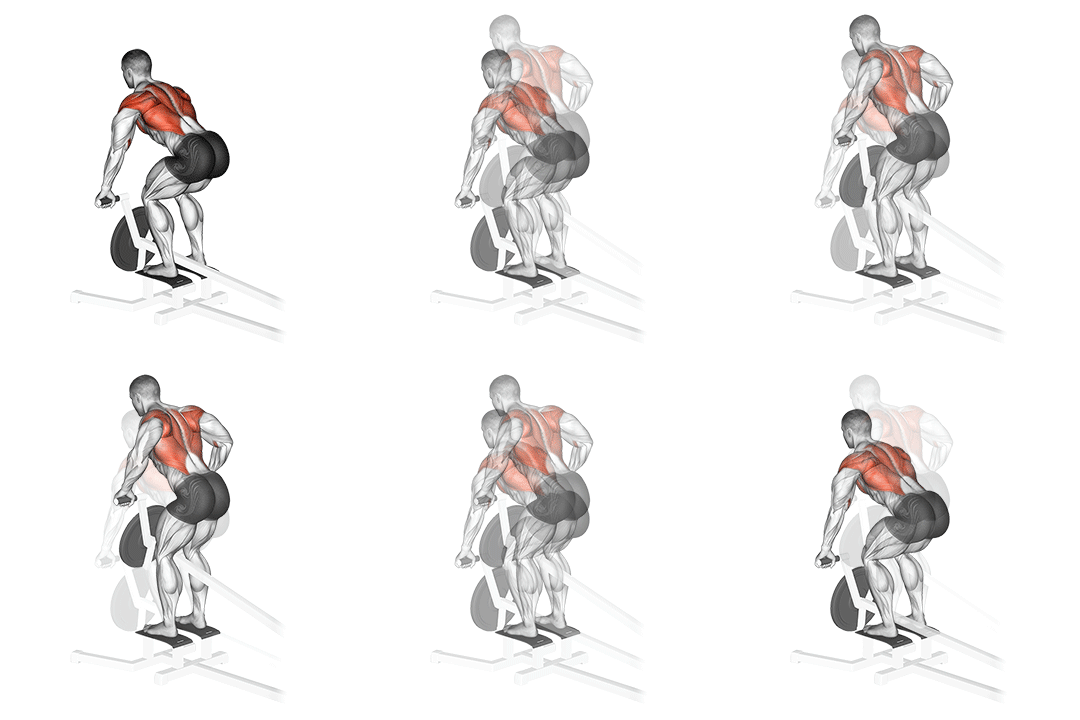
One end of the bar is fixed to a pivot, so the weight travels in a set arc and you do not have to balance it. That makes the T-bar row simpler to control than a free barbell. Our barbell row vs T-bar row comparison covers when to choose each.
Prefer a more upright torso? Try the Yates row. Want to train one side at a time? Use the single-arm dumbbell row. If the hinge position does not suit you at all, our list of bent over row alternatives has other ways to train the same muscles.
Bent Over Row Sets and Reps
| Goal | Sets | Reps | Rest |
|---|---|---|---|
| Strength | 3-5 | 4-6 | 3 min |
| Hypertrophy | 3-4 | 8-12 | 2-3 min |
| Endurance | 2-3 | 12-15 | 60-90 sec |
Muscle hypertrophy can be achieved across a wide range of loads (Schoenfeld et al., 2021), so choose the rep range you can perform without your torso moving. Start with 8 to 12 reps. Save sets of 4 to 6 for when you can hold the hinge under a heavy bar. End each set with 1 to 2 reps in reserve, or sooner if your torso angle starts to change.
Do not rush the rest. In an 8-week study of trained men, resting 3 minutes between sets produced greater strength gains, and more muscle growth in the thighs, than resting 1 minute (Schoenfeld et al., 2016). The bent over row tires your lower back and grip as well as your upper back, so take 2 minutes or more before a hard set.
Start with a weight you can row 10 times without your chest rising, and add 5 pounds when every set reaches the top of the rep range. To see where your numbers stand for your bodyweight, use our bent over row strength standards.
Rows count toward your weekly back volume, and more weekly sets for a muscle generally mean more growth (Schoenfeld et al., 2017). Row once or twice a week, and put the bent over row first or second in your back session, while your lower back is fresh. If you deadlift on the same day, deadlift first and expect to row a little less. For a full session, see our 30-minute back workout.
Bent Over Row FAQs
How far should you bend over in a bent over row?
Anywhere from about 45 degrees to parallel with the floor. The lower your torso, the longer the pull and the harder your hamstrings and lower back work to hold you there. Choose the lowest angle you can hold with a flat back for the whole set.
Where should the bar touch your body?
Between your lower ribs and your navel for the standard row. Pulling higher, toward your chest with your elbows out, moves the work toward the upper back and rear deltoids.
Why do I feel bent over rows in my lower back?
Some lower-back fatigue is normal, because the spinal erectors hold your torso up for the whole set. If they give out before your upper back does, the weight is too heavy for your hinge or you are rowing after too much deadlifting. Reduce the load, raise your torso slightly or row on a different day. Sharp or one-sided pain is not fatigue. Stop the set, and see a doctor or physical therapist if it does not settle.
Should you use lifting straps for bent over rows?
Use them when your grip gives out before your back does, which is common on sets of 10 or more. Row without straps on your warm-up and lighter sets so your grip keeps getting trained, and put them on for your heaviest work.
Is the bent over row enough to build a complete back?
It covers most of it. Rows pull the arms back toward the torso, so add an exercise that pulls them down from overhead, such as the lat pulldown or pull-ups, to train the lats through their full range.
References:
Fenwick, C.M., Brown, S.H. and McGill, S.M. (2009). Comparison of different rowing exercises: Trunk muscle activation and lumbar spine motion, load, and stiffness. Journal of Strength and Conditioning Research, 23(2), 350-358. PubMed
Schoenfeld, B.J. et al. (2016). Longer interset rest periods enhance muscle strength and hypertrophy in resistance-trained men. Journal of Strength and Conditioning Research, 30(7), 1805-1812. PubMed
Schoenfeld, B.J. et al. (2021). Loading recommendations for muscle strength, hypertrophy, and local endurance: A re-examination of the repetition continuum. Sports, 9(2), 32. PubMed
Schoenfeld, B.J. et al. (2017). Dose-response relationship between weekly resistance training volume and increases in muscle mass: A systematic review and meta-analysis. Journal of Sports Sciences, 35(11), 1073-1082. PubMed
Interested in measuring your progress? Check out our strength standards for Bent Over Row, One Arm Lat Pulldown, Lat Pulldown, and more exercises.