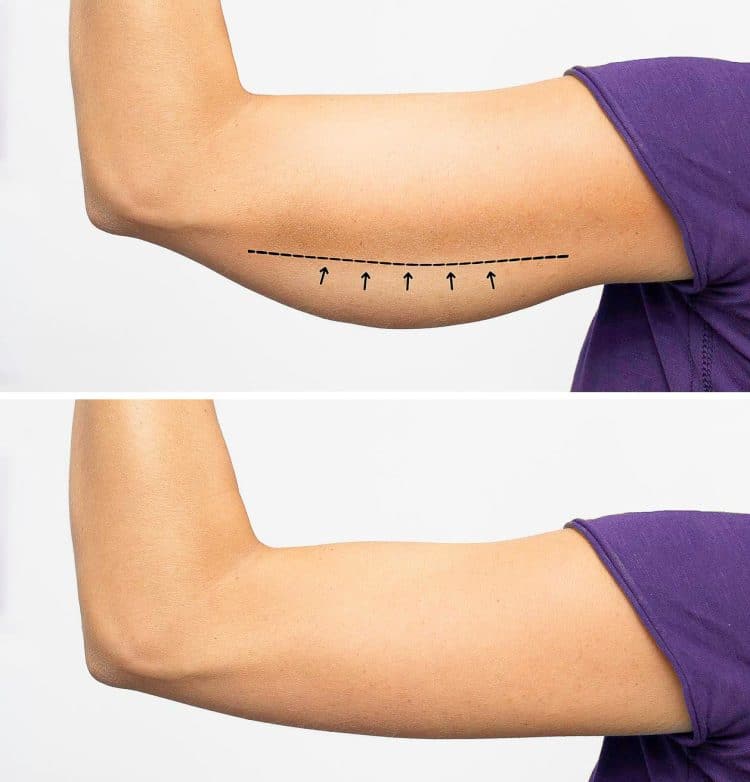
Before you channel your inner Batman, bat wings in the fitness culture are a pun. Bat wings here don’t refer to wide lats but extra fat on the back of the upper arms. There could be multiple reasons for fat accumulation on your triceps, including weight gain, old age, rapid weight loss, or medical conditions.
Loose and baggy skin on the rear of the humerus builds up quickly and easily, but losing it can take considerable time, effort, and patience. Flabby arms can affect your physique aesthetics and ruin your favorite outfits.
Getting rid of flabby arms requires following a balanced diet and training program. This article includes exercises, diet tips, and workouts that can help tone your arms. The good news is that most of the exercises in this list are bodyweight that you can do from the comfort of your home. You will need a resistance band for some exercises, but don’t worry; it doesn’t break the bank.
Reasons Behind Flabby Arm
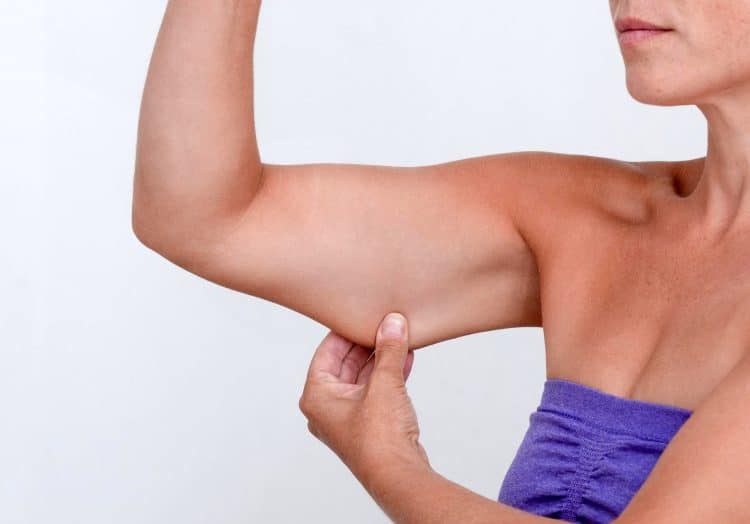
You can develop bat wings because of four reasons:
- Weight Gain: Putting on extra kilos can cause fat accumulation in various body parts. Some are genetically disposed to store fat at the back of their upper arm.
- Rapid Weight Loss: When an individual gains weight, their skin stretches and loses elasticity to accumulate extra weight and fat. Losing weight too quickly, however, breaks down the collagen and elastin fibers, denying the skin enough time to retract to normal after the sudden weight loss.
- Old Age: Our skin loses elasticity and muscle mass with age. These conditions lead to the development of flabby arms. Folks in this category can reduce their bat wings by building muscle mass but restoring skin elasticity is off the cards.
- Medical Conditions: Health issues that lead to weight gain can cause flabby arms. On the flip side, some medications can trigger fat storage in your posterior upper arms. Depending on your age, this problem can be fixed using proper medication. Talk to your doctor if you notice fat buildup while taking a new drug.
How To Get Rid of Flabby Arms?
Eradicating arm fat needs you to fix your lifestyle, meaning you have to take control of your diet, exercise, and recovery programs.
Here is an oversimplified explainer of the trio:
Diet
Overweight folks need to start with their diet. You must be in a calorie deficit to lose excess body fat. Start by calculating your average daily calorie intake. Deduct 500 calories from your average daily intake. Experts believe cutting 3,500 calories weekly can help you lose a pound of body weight a week.
Assess your weight loss progress weekly to ensure you are heading in the right direction. You can increase or decrease the calorie deficit based on your improvements.
Training
Although optional, exercising can help speed up your fat loss progress. Add two cardio sessions to your routine — a 10-15 minute HIIT session after a resistance training workout and a 30-40 minute LISS session to be done early morning on an empty stomach. These training routines will help you enter a calorie deficit.
Furthermore, biceps, triceps, shoulders, and back workouts can help tone the target muscle group. This article lists the 26 best exercises and three workouts to tone flabby arms.
Recommended: HIIT vs. LISS Cardio: Which One Is Best for Fitness and Fat Loss?
Recovery
Many downplay the importance of rest and recovery in a transformation program. You must allow your body enough time to recuperate between cardio and resistance training sessions by sleeping at least 7-8 hours each night.
You could also undergo liposuction to remove excess fat from your arms. Plastic surgery, however, should be the last resort.
26 Best Exercises For Flabby Arms
Below are the exercises that can help fix your bat wings:
1. Push-Up
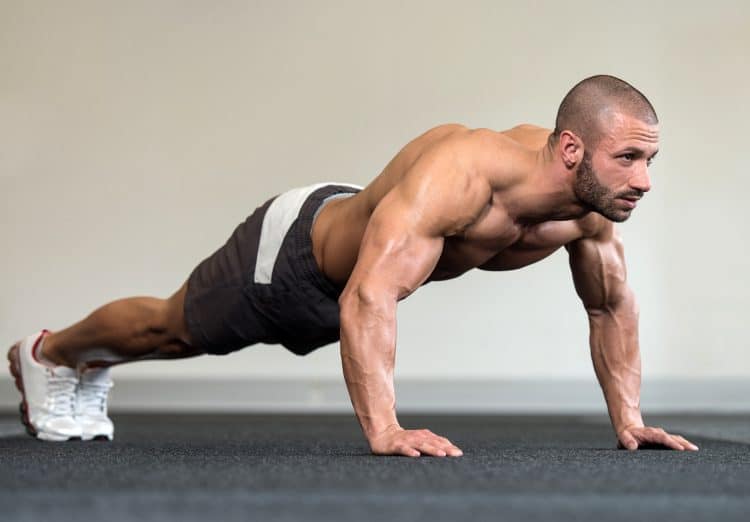
Push-ups are one of the most basic exercises. The compound movement targets the pecs, triceps, shoulder, and abs. Performing this exercise with a slow and controlled motion and contracting your triceps at the top can help stimulate and tone your flabby arms.
Steps:
- Assume a tabletop position with your hands under your shoulders and knees under your hips.
- Get into a push-up position by extending one leg at a time.
- Your head should be neutral and your body in a straight line from head to toe at the starting position.
- Slowly lower toward the floor by bending at your elbows and retracting your shoulder blades.
- Your chest should be a few inches off the floor at the bottom.
- Explode to the starting position by driving your palms into the floor.
- Pause and contract your triceps at the top.
- Repeat for recommended reps.
Pro Tip: Keep your upper arms contracted throughout the range of motion to prioritize triceps stimulation.
Check out our complete push-up guide here!
2. Shoulder Tap Push-Up
During the shoulder tap push-up, you spend considerable time balancing yourself on one arm. Plus, the elbow flexion activates your triceps. This exercise can help tone your arms and get rid of flabby arms.
Steps:
- Get into a push-up position.
- Slowly descend by retracting your shoulder blades and flexing your elbows.
- Lower your torso until your chest is a few inches off the floor.
- Explode to the starting position.
- Lift your right hand off the floor and touch your left shoulder while keeping your hips and shoulders stable.
- Return your right hand to the starting position.
- Perform another push-up.
- Tap your right shoulder with your right hand.
- Alternate between sides for recommended reps.
Pro Tip: Keep your core and glutes braced to maintain stability. Get on your knees if you have trouble completing the recommended reps in the conventional push-up position.
Check out our complete shoulder tap push-up guide here!
3. Diamond Push-Up
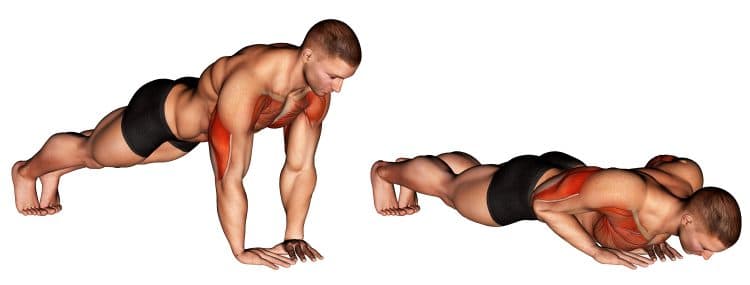
As you might have guessed by now, push-ups are a potent exercise for flabby arms. The diamond push-up focuses more on your triceps than the orthodox push-up variations.
Steps:
- Get into a push-up position.
- Place your hands together on the floor, so your thumbs and index fingers touch one another. Your hands should form a triangle.
- Slowly lower toward the floor by bending your elbows. Keep your head neutral throughout the exercise.
- Pause at the bottom.
- Explode to the starting position.
- Contract your tris at the top.
- Repeat for desired reps.
Pro Tip: You could perform the close-grip push-up if you feel unnecessary stress in your elbow, wrist, and shoulder joint while performing diamond push-ups.
Check out our complete diamond push-up guide here!
4. Pike Push-Up
This is an advanced push-up variation and should be a part of your progression program if the conventional push-ups are getting too easy. You need decent shoulder, triceps, and core strength to pull this off.
Steps:
- Get into the push-up position with your hands slightly wider than shoulder-width apart.
- Brace your core and pull your shoulders back and down.
- Lift your butt toward the ceiling without bending your legs.
- Your body should resemble an inverted V at the starting position.
- Walk your feet closer to your hands.
- Keeping your hips up, bend your arms and lower your head toward the floor.
- Your head should be a few inches off the floor at the bottom.
- Return to the starting position.
- Repeat for desired reps.
Pro Tip: As you get better at this exercise, you can perform the pike push-up by placing your feet on an elevated platform such as a bench. Decline pike push-ups emphasize the target muscle groups more than the conventional variation.
https://www.youtube.com/watch?v=sposDXWEB0A
Check out our complete pike push-up guide here!
5. Forearm Push-Up
The forearm push-up is an excellent exercise for folks with elbow pain. It also helps improve shoulder mobility, which boosts your performance in other exercises and daily functioning.
Steps:
- Get into a low plank position with your forearms on the ground. Your elbows should be under your shoulders, your toes tucked, and your legs extended.
- Lower your torso until it is a few inches off the floor by retracting your shoulder blades.
- Ensure your head is neutral and your body is in a straight line from head to toe.
- Explode back to the starting position.
- Repeat for recommended reps.
Pro Tip: If you have trouble achieving a full range of motion, place your forearms wider than shoulder-width apart.
6. Side Push-Up
Side push-up is a complex exercise that needs practice before you can get the most out of it. This lift requires you to perform push-ups while lying on your side, making it an incredibly effective exercise for flabby arms.
Steps:
- Lie down on your side on the floor with your knees stacked. Bend your legs at the knees.
- Place your bottom arm on your upper side.
- Place your upper hand on the floor in front of your shoulder so your forearm is perpendicular to the floor.
- Drive your palm into the floor to perform a push-up until your arm is extended.
- Slowly return to the starting position.
- Repeat for recommended reps before switching sides.
Pro Tip: Brace your core and glutes while performing this exercise for optimal stability, ab, and oblique recruitment.
7. Wall Push-Up
This beginner-friendly push-up variation will help you build upper body strength. You should skip this exercise if you can perform the conventional floor push-up. Or, you can use this exercise as the second exercise in a superset.
Steps:
- Stand arm’s length from a wall with your feet shoulder-width apart.
- Spread your fingers and place your hands on the wall slightly below shoulder level.
- Bend at your elbows and slowly lean your body toward the wall until your chest is a few inches away from it.
- Keep your head neutral, and your body from head to toe should be in a straight line throughout the exercise.
- Don’t flare your elbows. It ensures the focus remains on your triceps.
- Explode to the starting position.
- Repeat for recommended reps.
Pro Tip: As you get stronger on the wall push, perform this exercise using a single arm. It will result in better upper arm recruitment and fixing your flabby arms. Plus, unilateral exercises can help correct muscle and strength imbalances.
Check out our complete wall push-up guide here!
8. High Plank
Isometric exercises can help achieve optimal muscle fiber stimulation. Establishing a mind-muscle connection in compound or isolation exercises can be demanding as you are constantly moving. The plank is an isometric exercise that requires you to maintain the same position for as long as possible.
Steps:
- Get into a quadruped position on the floor. Your hands should be under your shoulders, your knees under your hips, and your toes tucked.
- Assume a push-up position by extending one leg at a time.
- Your head should be neutral and your body in a straight line from head to toe.
- Contract your core, glutes, and arms.
- Hold the position for as long as possible.
Pro Tip: Turn your palms outward for better upper arm stimulation.
Check out our complete plank guide here!
9. Up-Down Plank
It is an advanced plank variation that requires you to maintain stability and balance throughout the exercise. Since this exercise requires you to shuffle between high and low plank positions, it recruits upper arm muscles, which can help fix your bat wings.
Steps:
- Start in a high plank position. Your hands should be under your shoulders; your feet should be hip-width apart.
- Lift your left hand off the floor. Place your left elbow on the floor below your left shoulder.
- When stable, lift your right hand and place your right elbow on the mat.
- Lift your left forearm and plant your hand on the floor below your shoulder. Straighten your arm.
- Repeat on the right side.
- This completes one rep.
- Alternate between sides for recommended reps.
Pro Tip: Keep your core and glutes braced throughout the exercise. Ensure your body is in a straight line from head to toe while performing the up-down plank.
10. Kneeling Triceps Extension
Kneeling triceps extension works the medial and outer triceps heads. Pin your elbows while performing this exercise. It ensures optimal triceps engagement. You could wear a weighted vest to make this movement more difficult.
Steps:
- Kneel on the floor.
- Get in a tabletop position so your hands are under your shoulders and your knees are under your hips.
- Walk your hands out and place your hands on the floor in front of your head.
- Lean forward so your weight is on your arms.
- Keeping your lower legs steady, learn toward your hands until your chin is a few inches off the floor.
- Return to the starting position.
- Pause and contract your arms at the top.
- Repeat for desired reps.
Pro Tip: You could also perform bodyweight triceps extensions if you have access to a squat rack and a barbell. Using an elevated surface allows a greater range of motion.
Check out our complete kneeling triceps guide here!
11. Triceps Floor Dips
This exercise combines crab walks and triceps dips. Triceps floor dips demand a strong core so that you can hold the position for the duration of the set. If you have a lagging core, your abs might give out before your triceps while performing this exercise.
Steps:
- Sit on the floor with your knees bent and your feet flat.
- Plant your hands on the floor behind you. Your fingers should be pointing toward you.
- Lean back so your shoulders are above your palms.
- Lift your torso toward the ceiling by driving your palms into the floor and extending your elbows.
- Pause and contract your arms at the top.
- Slowly return to the starting position.
- Repeat for recommended reps.
Pro Tip: Ensure your hips don’t touch the floor at the bottom, as it will take away constant tension. Your torso angle should remain the same throughout the exercise.
12. Triceps Bench Dips
People without access to a bench can use an elevated platform like a chair, table, or bed. The triceps bench dips are a beginner-friendly exercise that can be done by folks with minimal training experience.
Steps:
- Sit on a flat bench.
- Place your hands on the edge of the bench at the sides of your hips. Your palms should be on the bench, and your fingers should be wrapped around the pad.
- Walk your feet out. Your upper legs should be perpendicular to the floor at the start.
- Slowly lower your body until your upper arms are parallel to the floor.
- Keep your torso as close to the bench as possible. Holding your torso at an angle puts unnecessary stress on your shoulders.
- Explode back to the starting position.
- Repeat for recommended reps.
Pro Tip: After you master the triceps bench dips with bent legs, perform this exercise with your legs extended.
Check out our complete triceps bench dips guide here!
13. Parallel Bar Dips
This dips variation is for intermediate to advanced lifters. Beginners can perform this exercise on an assisted dips machine. Parallel bar dips are a compound movement that works your triceps, shoulders, chest, and back.
Steps:
- Grab the parallel bars with a neutral grip. Your fingers should be facing outward.
- Jump up and lock out your elbows.
- Keep your body in a straight line from head to toe for better triceps recruitment.
- Keeping your elbows tucked in, slowly lower your body until your upper arms are parallel to the floor.
- Explode back up. Pause and contract your triceps at the top.
- Repeat for recommended reps.
Pro Tip: Keep an upright torso while performing this exercise. Leaning forward will result in greater pectoral muscle engagement.
Check out our complete parallel bar dips guide here!
14. Resistance Band Triceps Kickback
Resistance bands are a must-have if you train at home. This versatile training equipment can provide just the right amount of muscle stimulation to achieve hypertrophy. You could also increase or decrease the resistance by grabbing the band at different positions.
Steps:
- Anchor one end of the resistance band at waist height to a sturdy surface like a pole.
- Grab the other end in one hand and walk back until the band is taut.
- Bend over until your torso is almost parallel to the floor.
- Keeping your elbow pinned to your side, extend your elbow until your upper and lower arms are in a straight line.
- Pause and contract your tris at the top.
- Slowly return to the start position.
- Repeat for recommended reps before switching sides.
Pro Tip: If you cannot find a sturdy pole, assume a staggered bent-over stance and place one end of the resistance band under your front foot. Hold the band at the correct position for optimal triceps stimulation.
15. Resistance Band Overhead Triceps Extension
There are two ways to perform this exercise. You could wrap one end of a resistance band around a sturdy pole at waist height or place it under your feet. We recommend the second option as it keeps the band steady.
Steps:
- Assume a shoulder-wide staggered stance.
- Wrap one end of a resistance band under the ball of your rear foot. Grab the other end on the same side.
- Your upper arm shoulder be perpendicular to the floor at the starting position. Your lower arm will be behind your body.
- Extend your elbow until your arm is in a straight line.
- Slowly return to the starting position.
- Repeat for recommended reps before switching sides.
Pro Tip: You could add the TRX triceps extensions to your training regimen as you get better at this exercise.
16. Resistance Band Side Triceps Extension
Keep your elbow steady to get the best bang for your buck while performing this exercise. Upper arm movement can result in rear delt engagement, which can hamper your triceps stimulation.
Steps:
- Wrap one end of a resistance band around a sturdy pole.
- Stand with your side toward the pole.
- Grab the other end with your hand farthest from the pole.
- Raise your upper arm to your side, so it is in line with your shoulders. Your working hand should be in front of your chest at the start position.
- Keeping your elbow pinned, extend your arm straight at your side.
- Return to the starting position.
- Repeat for recommended reps before switching sides.
Pro Tip: You could also work the band behind your head if you feel better triceps engagement in that position. Follow the same setup, but instead of holding the band in front of your chest, hold it behind your head.
17. Resistance Band Triceps Push-Down
For this exercise, you’ll need to wrap the resistance band around an elevated surface like a pull-up bar. Alternatively, you could use a resistance band door anchor if you train at home.
Steps:
- Wrap a resistance band around a pull-up bar.
- Stand upright with a shoulder-wide stance and grab the ends of the resistance band in each hand.
- Lean forward slightly by hinging at your hips.
- At the starting position, your upper arms will be perpendicular, and your lower arms parallel to the floor.
- Keeping your elbows pinned, extend your arms until they are in a straight line.
- Pause and contract your tris at the bottom.
- Slowly return to the starting position.
- Repeat for recommended reps.
Pro Tip: You could alternate between neutral (palms facing each other), pronated (overhand), or supinated (underhand) grips to find the hand placement that works best for you.
18. Resistance Band Biceps Curl
Although the triceps should be your focus muscle group to eliminate arm fat, incorporating a few biceps exercises into the mix can help tone your guns faster. You should use a D-handle resistance band for this exercise.
Steps:
- Stand upright with a shoulder-wide stance.
- Grab each end of the band with an underhand grip.
- Place the center of the resistance band under the balls of your feet.
- The band should be taut at the bottom of the lift.
- While keeping your elbows pinned to your sides, raise your hand toward the ceiling until they are at your chest height.
- Pause and contract your bis at the top.
- Slowly return to the starting position.
- Repeat for recommended reps.
Pro Tip: Take this exercise to the next level by grabbing a dumbbell in each hand and wrapping a resistance band around their handles.
19. Resistance Band Isometric Biceps Curl
Consider this exercise a plank for your guns. The resistance band isometric biceps curl is a great exercise to achieve a biceps pump. After trying this exercise for the first time, you’ll be sore the next day.
Steps:
- Grab the ends of a D-handle resistance band in each hand.
- Stand upright with a shoulder-wide stance and position the center of the band until the balls of your feet.
- Your arms should be extended straight at your sides at the starting position.
- Keeping your elbows pinned, curl the band until your lower arms are parallel to the floor.
- Hold the position for 10-30 seconds.
- Slowly return to the starting position.
- Repeat to muscle failure.
Pro Tip: Grabbing the band with an underhand grip stimulates your biceps brachii. Using a neutral grip fires your brachialis and brachioradialis, which can help build biceps and forearm thickness.
20. Resistance Band Overhead Press
Although overhead pressing movements are primarily shoulder exercises, they engage the triceps. Adding resistance band overhead presses to your exercise arsenal can help tone your flabby arms.
Steps:
- Stand upright on a band with a shoulder-wide stance.
- Hold the band at shoulder height using a pronated grip. Your thumbs should be pointing toward one another.
- Brace your core and glutes and press the band overhead by extending your elbows and flexing your shoulders.
- Contract your triceps at the top.
- Slowly return to the starting position.
- Repeat for recommended reps.
Pro Tip: Ensure optimal shoulder and triceps engagement by avoiding using momentum by jerking your knees.
Check out our complete resistance band overhead press guide here!
21. Resistance Band Bent-Over Row
Rowing exercise can help engage your triceps on the static contraction at the top. You must ensure that you’re not going overboard with the resistance and are following a slow and controlled motion.
Steps:
- Stand on a resistance band with a shoulder-wide stance. Grab each end of the resistance band with a neutral grip.
- Push your hips back and bend forward until your torso is almost parallel to the floor.
- Lift the bands to your sides by contracting your shoulder blades and raising your elbows toward the ceiling.
- Slowly lower to the starting position.
- Repeat for recommended reps.
Pro Tip: Wrap the resistance band around a pair of dumbbells if this exercise feels too easy. You must, however, remember that this exercise is about engaging your triceps and not working your lats.
22. Pull-Up
The pull-up is an incredibly effective upper-body exercise. You’ll focus on this lift’s eccentric part (lowering down) for your flabby arms. Use an assistance pull-up machine if you cannot perform a bodyweight pull-up.
Steps:
- Grab the bar using a pronated grip with a slightly wider than shoulder-width grip.
- Brace your core and glutes, and push your shoulders back and down.
- Pull your chin toward the bar using your lats. Drive your elbows toward the floor and contract your shoulder blades.
- Slowly return to the starting position while focusing on your bat wings.
- Repeat for recommended reps.
Pro Tip: Use a monkey (thumbless) grip to reduce your biceps involvement. Keep your head neutral, as dropping it back can strain your neck.
Check out our complete pull-up guide here!
23. Arm Circles
Arm circles are an excellent warm-up exercise for your upper body workouts. You can also engage your arms in this exercise and work on your bat wings by making a few tweaks.
Steps:
- Stand with a shoulder-wide stance.
- Extend your arms to your sides, parallel to the floor.
- Push your shoulders down and back. Pull your fingers toward your body and push out your palms. This will result in better arm stimulation.
- Rotate your arms clockwise at your shoulders.
- Perform the arm circles until you feel a burn in your shoulders and arms or if you can’t hold your arms parallel to the floor.
- You could also perform 10-20 clockwise arm circles and an equal number of anticlockwise circles.
Pro Tip: Wear wrist weights to make this exercise harder.
Check out our complete arm circle guide here!
24. Downward-Facing Dog
This yoga pose works your entire body. Transferring your weight onto your arms can help engage your triceps and burn the stubborn arm fat.
Steps:
- Get into a quadruped position. Place your wrists slightly in front of your head and your knees underneath your hips.
- Push back through your hands to lift your hips and straighten your legs.
- Let your head hang. Pull back your shoulder blades.
- Keep your tail high, rotate your thighs inward, and sink your heels towards the floor.
- Pause at the top for as long as possible.
- Return to the starting position.
- Repeat for recommended reps.
Pro Tip: Contract your upper arms at the top of this exercise for optimal triceps stimulation.
25. Resistance Band Pull-Apart
Resistance band pull-apart is an often overlooked exercise for flabby arms. Not only does it help reduce your arm fat, but it can also improve your posture and shoulder mobility.
Steps:
- Stand upright with a shoulder-width stance.
- Grab a resistance band in both hands with an overhand grip.
- Extend your arms and lift them to shoulder height.
- Pull the band apart until it touches your chest.
- Pause and contract your upper arms at the top.
- Slowly return to the start position.
- Repeat for desired reps.
Pro Tip: Switch between the overhand, underhand, and neutral grip to train your arms and rear delts from different angles.
Check out our complete band pull-apart guide here!
26. Battle Ropes
Battle ropes are a brutal cardiovascular and strength exercise. They help improve your upper body conditioning and can be instrumental in burning arm fat.
Steps:
- Take a shoulder-wide stance. Grab the ends of the battle rope in each hand.
- Bend your knees slightly and hinge at your hips, so your torso is at a 45-degree angle with the floor.
- Make waves with the rope by moving your arms up and down and slamming the rope on the floor.
- Repeat for desired time, duration, or reps.
Pro Tip: Keep your core braced and spine neutral to ensure stability.
Check out our complete battle ropes guide here!
3 Flabby Arm Workouts
Below are three workouts that can help get rid of your bat wings:
Workout 1
- Resistance Band Pull-Apart: 5 x 20-30
- Push-Up: 3 x 15
- Kneeling Triceps Extension: 3 x 15
- Resistance Band Triceps Kickback: 3 x 15
- Arm Circles: 3 x 20-50
Workout 2
- Downward Facing Dog: 3 x 15
- Diamond Push-Up: 3 x 15
- Resistance Band Biceps Curl: 3 x 15
- Resistance Band Overhead Press: 3 x 15
- Parallel Bar Dips: 3 x 10-15
Workout 3
- Pike Push-Up: 3 x 15
- Up-Down Plank: 3 x 15
- Resistance Band Triceps Kickback: 3 x 15
- Resistance Band Bent-Over Row: 3 x 15
- Battle Ropes: 3 x Failure
Start each workout with a 10-15 minute HIIT cardio session on your favorite machine.
Follow any of these workouts twice a week for optimal results. Keep your rest duration between exercises between 30-60 seconds to maintain a high training intensity optimal for burning fat.
Frequently Asked Questions
Can I lose bat wings without changing my diet?
Yes, you could lose excess arm fat without changing your diet plan. It might, however, take much longer as you’ll have to enter the calorie deficit by ramping up your cardio and resistance training workouts. You can lose bat wings without changing your diet but being in a calorie deficit is non-negotiable.
Can flabby arms be toned?
Yes, you can tone your flabby arms by following a balanced diet, training, and recovery program. Add the exercises mentioned in this article to your arms, shoulder, and back training regimen to speed up your progress.
What is the fastest way to fix flabby arms?
Staying in a calorie deficit, performing two cardio sessions a day (HIIT and LISS), and doing the exercises mentioned in this article are the fastest way to fix your bat wings.
How much time does it take to get rid of flabby arms?
It will depend on your starting condition. Folks over 20 percent body fat need to follow the steps mentioned in this article for 8-12 weeks before seeing the needle budge in the right direction.
What is the best exercise for flabby arms?
The triceps and biceps exercises mentioned in this article are the best exercise to tone your bat wings. You should, however, remember these exercises cannot replace the role of cardio or a calorie deficit in shedding arm fat.
Why are women more prone to flabby arms?
Flabby arms are more apparent in women than men. It is mainly because of the female sex hormone — estrogen. Because of higher estrogen levels, women have 6 to 11 percent more body fat than men. Furthermore, estrogen reduces a woman’s ability to burn energy after eating, resulting in higher fat storage. Most women deal with flabby arms over the age of 60. [1]
Wrapping Up
Arm fat can be stubborn and might test your patience. You must remember that spot reduction is nothing more than a fantasy. Losing fat anywhere in your body requires balancing your diet, training, and recovery.
Adding these 26 exercises and three workouts to your training arsenal can help get rid of the flabby arms and get your guns Instagram-ready. Make sure you back it up by following a macro-focused calorie-deficit diet. Best of luck!
References
Fitness Volt is committed to providing our readers with science-based information. We use only credible and peer-reviewed sources to support the information we share in our articles.
- University of New South Wales. “Why Do Women Store Fat Differently From Men?.” ScienceDaily. ScienceDaily, 4 March 200
Tip: If you're signed in to Google, tap Follow.


