Do you want to develop unbreakable lower body endurance or improve your hip mobility and knee stability? Look no further than the horse stance.
Interestingly, almost every region of the world has at least one martial art. Japan’s fighting styles include Judo and Karate, while Russia has Sambo, Thailand has Muay Thai, Indonesia has Penak Silat, France has Savate, and Brazil has Capoeira.
While each martial art is different, they all share several characteristics, which suggests they have a shared origin. They also have similar values, such as discipline, steadfastness, determination, resilience, and focus.
Among these diverse arts, one exercise stands out as a universal staple—the horse stance. However, despite its widespread use, the horse stance is most commonly associated with Chinese Kung Fu. In Chinese, the horse stance is called mǎ bù, or 马步. Indeed, it’s almost impossible to imagine a Kung Fu movie without the protagonist performing this movement in their inevitable training montage.
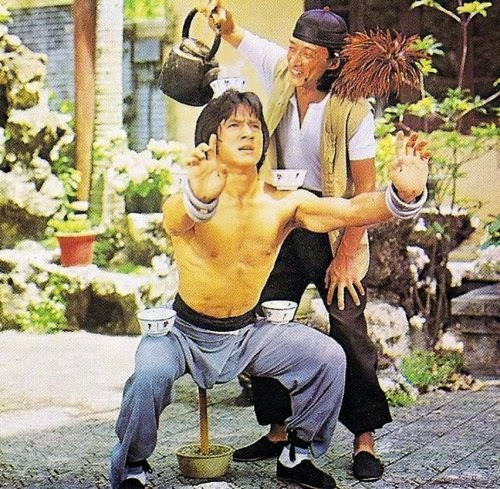
However, the horse stance is more than a quirky traditional Kung Fu exercise; it’s also highly functional and could be the missing piece in the jigsaw of your lower body training.
Level Up Your Fitness: Join our 💪 strong community in Fitness Volt Newsletter. Get daily inspiration, expert-backed workouts, nutrition tips, the latest in strength sports, and the support you need to reach your goals. Subscribe for free!
In this in-depth guide, we reveal why and how to do the horse stance and the exercises you can perform instead.
Horse Stance – Muscles Worked
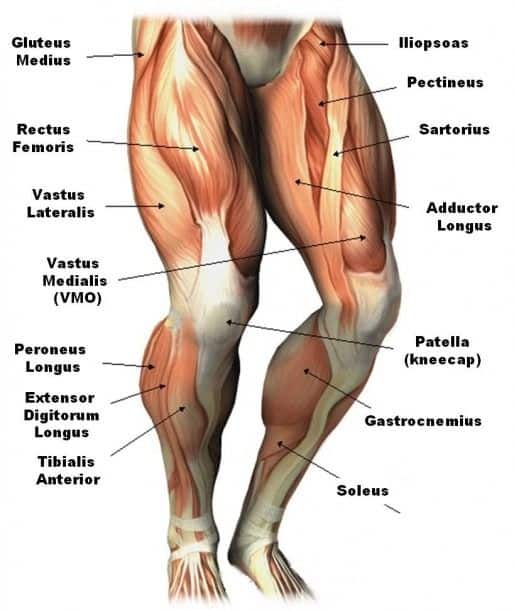
Before we get into how to perform the horse stance, let’s take a moment to examine what muscles are being engaged. But, to be fair, you’ll soon feel the relevant muscles starting to work the first time you try the horse stance for yourself!
The main muscles trained during the horse stance are:
Quadriceps
Located on the fronts of your thighs and known as the quads for short, these are the muscles you’ll probably feel burning most during the horse stance. There are four quadriceps muscles:
- Rectus femoris
- Vastus lateralis
- Vastus medialis
- Vastus intermedius
The primary function of the quadriceps is knee extension, although one of the quads is also a hip flexor. The quads hold your knees at about 90 degrees during the horse stance, and yes, all that burning and shaking is entirely normal.
Hamstrings
The hamstrings are a biaxial muscle, meaning they cross and affect two joints. As such, they are responsible for flexion of the knee and extension of the hip. The hamstrings are located on the back of your thighs and comprise three muscles:
- Semimembranosus
- Semitendinosus
- Biceps femoris
Gluteus Maximus
The gluteus maximus, or glutes for short, is the largest muscle in the human body, and one of the most powerful. Its main function is the extension of the hip. Moreover, its variously aligned fibers also play a part in hip abduction, adduction, and rotation.
Gluteus minimus and medius
The gluteus minimus and medius are smaller gluteal muscles mostly responsible for hip abduction and rotation. The wide foot position during the horse stance means these mini-glutes are very active when you perform this exercise. If you feel your outer hips starting to cramp, these muscles are probably the reason.
Adductors
The adductors are located on the inside of your thighs. They are responsible for drawing your thighs into the midline of your body, which is a movement called adduction, hence their name. During the horse stance, these muscles help stabilize your knees and hips. You’ll also feel them stretching. The three muscles that make up this group are:
- Adductor longus
- Adductor brevis
- Adductor magnus
Core
Core is the collective name for the muscles of your midsection. They contract inward to create intra-abdominal pressure and support your lumbar spine. The main core muscles are:
- Rectus abdominis
- Obliques
- Transverse abdominis
- Erector spinae
It’s important to note that these muscles are working isometrically or statically during the horse stance. So, while they are generating lots of muscle tension, their length remains unchanged.
Now that we’ve covered the muscles you’ll be working, let’s dive into how to actually perform the horse stance.
How to Do the Horse Stance
Get more from the horse stance while keeping your risk of injury to a minimum by following these guidelines:
- Stand in good posture with your feet together.
- Next, turning your toes out first, take five small heel-toe steps so your feet are wider than shoulder-width apart.
- Turn your toes out slightly or have your feet parallel as preferred and dictated by your knee health. Toes turned out is somewhat more knee-friendly.
- Raise your arms to shoulder level with your elbows and wrists bent. Roll your shoulders forward and your pelvis under (posterior pelvic tilt).
- Bend your legs and squat down until your thighs are parallel to the floor or your hips are level with your knees. Do not allow your knees to cave in. Nonetheless, it’s okay if they travel forward, but they should remain behind your toes.
- Hold this position for the required duration: 30-60 seconds for beginners and 3-5 minutes for more experienced exercisers.
- Breathe slowly and evenly throughout.
- Stand up, shake your legs out, and repeat as necessary.
Pro Tips:
Looking to get more from this exercise? Check out these seven hot tips!
- Rest a broomstick across your thighs to ensure they’re parallel to the floor. If the stick rolls off your legs, you are not deep enough. However, you’ve descended too far if it rolls toward your hips.
- Move your feet further out, e.g., seven or nine heel-toe steps, to increase the flexibility demand of this exercise.
- Practice daily to improve hip mobility and endurance.
- Do this exercise at the start of your leg workouts as part of your warm-up or at the end as a finisher.
- Gradually increase how long you hold the horse stance, working up to 3-5 minutes per set.
- Lower your arms and pull your hands into your ribs to make the horse stance more demanding. This eliminates the counterbalancing effect of extending your arms in front of you, putting more weight over your feet.
- Put a light booty band around your legs to increase gluteus minimus and medius engagement.
Horse Stance Benefits and Drawbacks
Not sure if the horse stance deserves a place in your workouts? Consider these benefits and then decide!
Better Muscular Endurance
Muscular endurance, also known as strength endurance, is the ability of your muscles to continue generating force for an extended time. It’s critical in almost every sport and for many everyday activities. Good muscular endurance means you won’t fatigue as quickly. By mastering the horse stance, you’ll significantly improve your lower body muscular endurance, making you more resistant to fatigue.
Increased Strength
While the horse stance won’t turn you into a powerlifter, it will improve your leg strength, especially when your muscles are in a stretched position. This will transfer well to athletic endeavors and everyday life. However, if you want really strong legs, weighted exercises like barbell squats and leg presses are arguably your best choice.
Improved mobility and flexibility
In a nutshell, the horse stance is a weighted stretch for many of your lower body muscles. Getting used to maintaining a deep squat will do wonders for your lower body mobility and flexibility. However, unlike regular stretching exercises, doing the horse stance will also improve strength and endurance, making it a very efficient and functional movement.
No equipment required
While resting a broomstick across your thighs is an excellent way to ensure you are in a deep enough squat, it’s not compulsory. Actually, you don’t need any equipment to do the horse stance. This makes it an ideal exercise for home workouts, those who like to train outdoors, and anyone who wants a leg exercise they can do anywhere and anytime.
Progress is easy to measure
With no reps to count or weights to record, you’ll find it easy to determine if you are getting better at the horse stance. Each time you manage to hold the position for even a few seconds longer, it’s a clear sign that you’re making progress.
Improved positional awareness
Holding a horse stance for several minutes gives you plenty of time to take stock of the position of your limbs and how small changes can alter the effect of the exercise. During this time, feel free to experiment with the position of your knees relative to your feet, the angle of your hips, the lean of your torso, and the tilt of your pelvis.
Learning to sense and control the position of your limbs makes it easier to master almost any athletic or physical skill, including developing better posture.
Minimal joint or lower back stress
Compared to many weighted leg exercises, the horse stance is very joint-friendly and doesn’t put an excessive load on your spine. In contrast, exercises like barbell squats are much more stressful and can cause joint pain in some exercisers. Most weighted leg exercises also compress the spine, which could cause lower back pain. Injuries while doing the horse stance are rare.
Builds discipline
While most people can quickly progress from 60 seconds to 2-3 minutes of horse stance, it’ll take effort, willpower, and time to work up to five minutes or more. To reach that level, you’ll need to commit to pushing through the pain barrier several times a week, putting your motivation and self-discipline to the test.
However, rather than being negative, this is very positive, and you’ll be able to harness this discipline and apply it to other aspects of your life. The next time the going gets tough, e.g., late night studying for an exam, working hard to meet a deadline, etc., just remember that you’ve pushed yourself much harder in training, and this new challenge is well within your capabilities.
Lower blood pressure
High blood pressure puts a lot of extra stress on your heart and can increase your risk of heart attack and stroke, two leading causes of death in the Western world. Interestingly, a study published in the British Journal of Sports Medicine in 2023 found that isometric exercises, such as planks and wall sits, were more effective for lowering blood pressure than other forms of exercise (1).
The study looked at 270 randomized controlled trials involving a total of over 15,000 participants. It found that isometric exercises significantly reduced systolic blood pressure (the top number) by 8.24 mmHg and diastolic blood pressure (the bottom number) by 4 mmHg. This was compared to a reduction of 4.49 mmHg for aerobic exercise, 4.55 mmHg for dynamic resistance training, 6.04 mmHg for combined training, and 4.08 mmHg for high-intensity interval training.
The researchers concluded that isometric exercises should be considered a first-line treatment for lowering blood pressure, especially for people who cannot do other forms of exercise.
Needless to say, as it’s an isometric exercise, practicing the horse stance could help you lower your blood pressure or prevent your BP from elevating in the future. However, if you have hypertension, you should consult your doctor before performing this exercise.
While the horse stance is a mostly beneficial exercise, there are also a few drawbacks to consider:
Not the best exercise for building maximal strength
Specificity is one of the most critical principles of training. In simple terms, specificity means your body adapts to the type of exercise you do. While doing the horse stance will develop unbreakable endurance, it won’t do much for your brute strength. Because of specificity, if you want to get stronger, you need to expose your muscles to heavy weights, typically 85% or greater than your one-repetition maximum.
Not great for building muscle
It takes metabolic stress and muscle tension to trigger the mechanisms responsible for hypertrophy or muscle growth. Although the horse stance does offer some level of metabolic stress and muscle tension, it’s not enough to trigger significant muscle growth. As such, exercises like leg extensions, leg presses, squats, and leg curls are generally better for building muscle.
Strength gains are limited to the angle at which you hold the horse stance
The classic horse stance is usually done with the thighs parallel to the floor and knees and hips flexed to about 90 degrees. Holding this position increases your strength at these joint angles and about 15 degrees above and below.
Therefore, if you’re looking to develop strength across a full range of motion, you’ll need to incorporate dynamic exercises like deep air squats, lunges, and high step-ups into your routine.
Now that you know the ins and outs of performing the horse stance, let’s explore some alternative exercises you can try.
7 Horse Stance Variations and Alternatives
The horse stance is a highly effective lower-body exercise, but that doesn’t mean you need to do it all the time. There are several variations and alternatives you can use to keep your workouts productive and interesting:
1. Wall Squat
Muscles targeted: Quadriceps, gluteus maximus, hamstrings.
If there is a disadvantage to the horse stance, it’s that fatigue tends to take a long time to accumulate. This is because your body weight is the only resistance you have to overcome. Wall squats allow you to push harder with your legs, increasing the overload on your muscles so you can fatigue them more quickly. Push hard enough, and 20-30 seconds is more than enough.
Level Up Your Fitness: Join our 💪 strong community in Fitness Volt Newsletter. Get daily inspiration, expert-backed workouts, nutrition tips, the latest in strength sports, and the support you need to reach your goals. Subscribe for free!
Steps:
- Stand with your back leaning against a smooth wall. Stand with your feet between shoulder and hip-width apart, about 18-24 inches from the wall.
- Slide down the wall until your thighs are roughly parallel to the floor.
- Push your lower back against the wall as hard as you can.
- Hold for as long as you can continue to generate maximum force, typically 20-30 seconds.
- Relax, rest a movement, and repeat.
Benefits:
- More time-efficient than the horse stance.
- Better for building muscle mass and strength.
- No balance and less mobility required.
Tips:
- Do not hold your breath, as doing so can leave you feeling faint or elevate your blood pressure.
- Experiment with the angle of your knees and hips for comfort and to make the exercise as effective as possible.
- You can do this exercise with a wide, medium, and narrow stance to hit your legs from varying angles.
2. Glute Bridge
Muscles Targeted: Gluteus Maximus, Hamstrings
If you’re looking to give your glutes and hamstrings a solid workout without any equipment, the Glute Bridge is your go-to exercise. It’s an isometric hold that really fires up the posterior chain, and you’ll feel those muscles working in no time.
Steps:
- Lie on your back on a mat with your knees bent and feet flat on the floor, hip-width apart. Arms should be at your sides, palms facing down.
- Tighten your core and squeeze your glutes.
- Push through your heels to lift your hips towards the ceiling, keeping your core engaged and your back straight.
- Hold this position for the desired duration, aiming for 30-60 seconds for beginners and up to 2-3 minutes for the more experienced.
- Lower your hips back down to the starting position, rest briefly, and repeat.
Benefits:
- Excellent for targeting the glutes and hamstrings.
- Builds lower body endurance and strength without any equipment.
- Enhances core stability and hip mobility.
Tips:
- Keep your feet flat and push through the heels to better engage the glutes.
- Maintain a straight line from your shoulders to your knees at the top of the movement.
- Put a booty band around your legs to increase glute engagement.
3. Chinese Plank
Muscles targeted: Erector spinae, gluteus maximus, hamstrings.
Are you looking to up the ante on your posterior chain training? Try the Chinese Plank! This exercise offers a more challenging isometric hold compared to the Glute Bridge. It’s a straightforward yet powerful exercise that requires minimal equipment. However, despite being very low-tech, this move is tough enough for even the most experienced exerciser.
Steps:
- Place two benches or sturdy platforms parallel to each other, about body length apart.
- Lie down between the benches, positioning your heels on one bench and your upper back and shoulders on the other.
- Engage your core and glutes to form a straight line from your heels to your head.
- Hold this position for your desired time, aiming for 30 seconds to a minute or more.
- Relax, catch your breath, and repeat as needed.
Benefits:
- Provides a powerful workout for the lower back, enhancing posture.
- Engages the glutes and hamstrings without knee stress.
- Highly adaptable, requiring only basic equipment like benches or platforms.
Tips:
- Maintain elevated hips to keep your body in a straight line; avoid any sagging.
- Concentrate on activating the glutes throughout the hold for maximum muscle engagement.
- Make this exercise more difficult by extending one leg at a time while holding the plank position.
4. Air Squat
Muscles Targeted: Quadriceps, gluteus maximus, hamstrings.
Our next exercise is air squats, a movement so familiar and basic that it’s often overlooked. Not only will air squats develop full-range-of-motion strength and endurance, but they’ll also deliver a beneficial cardio conditioning workout. Trust me, don’t underestimate the power of this foundational move. So, whether you’re a beginner or a seasoned pro, air squats offer a versatile workout that can be tailored to meet your specific fitness goals. Give it a try!
Steps:
- Stand with your feet shoulder-width apart, toes slightly turned out.
- Keep your chest up and shoulders back as you initiate the squat by pushing your hips back.
- Lower your body until your thighs are at least parallel to the floor, or go deeper if your mobility allows.
- Push through your heels to return to the starting position.
- Perform the movement for the desired number of reps or time duration.
Benefits:
- Excellent for building foundational leg strength and setting the stage for more advanced exercises.
- An effective exercise you can do almost anywhere and anytime.
- High-rep air squats are just as challenging as a long-hold horse stance.
Tips:
- Keep your core engaged throughout the movement to protect your lower back.
- Make sure your knees are tracking over your toes; don’t let them cave in.
- Experiment with the width of your stance for comfort and to hit your muscles from varying angles.
5. Bulgarian Split Squat
Muscles Targeted: Quadriceps, gluteus maximus, hamstrings.
Ready to take your leg training to the next level? Bodyweight Bulgarian split squats are your ticket to a more challenging workout. This unilateral exercise targets one leg at a time, helping you identify and correct muscle imbalances. Plus, it’s a fantastic way to engage your core and improve your balance.
Steps:
- Stand a few feet away from a bench or elevated surface, facing away from it.
- Place one foot on the bench behind you, laces down.
- Lower your body by bending your front knee, keeping your chest up and shoulders back.
- Continue lowering until your front thigh is parallel to the ground or as far as your mobility allows.
- Push through the heel of your front foot to return to the starting position.
- Complete the desired number of reps, then switch legs.
Benefits:
- Offers a higher-intensity workout compared to basic squats.
- Enhances lower body stability, which is crucial for athletic performance and daily activities.
- Provides a stretch for the hip flexors of the rear leg, adding to overall hip mobility and health.
Tips:
- Maintain a tall posture throughout the movement; avoid leaning forward.
- Ensure your front knee doesn’t go past your toes as you lower down.
- Adjust the distance from the bench to find the most comfortable and effective stance for you.
6. Lateral Lunge
Muscles Targeted: Quadriceps, gluteus maximus, adductors.
Lateral lunges are a fantastic addition to any leg workout, and they share some similarities with the wide-stance horse stance, particularly when it comes to working the adductors.
While the wide-stance horse stance is an isometric hold that challenges both your strength and flexibility, lateral lunges offer dynamic movement that also targets these areas.
So, if you’re looking to diversify your leg training, lateral lunges are a versatile exercise that can be easily modified to suit your fitness level, making them a valuable addition to your routine.
Steps:
- Start by standing with your feet together and your hands at your sides or on your hips.
- Take a large step to the side with one foot, keeping the other foot in place.
- Bend the knee of the stepping leg, lowering your body into a lunge position. Keep the other leg straight.
- Push off the bent leg to return to the starting position.
- Repeat for the desired number of reps or duration, then switch sides.
Benefits:
- Improves lateral strength and stability, which is often neglected in traditional leg workouts.
- Offers a dynamic way to stretch and strengthen the adductors, enhancing both flexibility and muscle endurance.
- Provides a functional exercise that mimics movements in various sports and daily activities.
Tips:
- Keep your chest up and your back straight throughout the movement.
- Ensure your bent knee is aligned with your foot, avoiding any inward collapse.
- Adjust the width of your step to find the most comfortable and effective position for you.
7. Squat Jump
Muscles Targeted: Quadriceps, gluteus maximus, hamstrings, calves.
Squat jumps are the go-to exercise for anyone looking to add an explosive element to their leg training. While the horse stance is all about static strength and endurance, squat jumps are the polar opposite, focusing on power and speed.
Squat jumps are a high-impact, high-reward exercise that can significantly improve your athletic performance. Ready to take your leg training to the next level? Let’s jump right in!
Steps:
- Start in a squat position with your feet shoulder-width apart.
- Explode upwards, jumping as high as possible while swinging your arms overhead.
- Land softly, absorbing the impact by immediately going into the next squat.
- Repeat for the desired number of reps or time duration.
Benefits:
- Develops explosive power, crucial for athletic performance in sports like basketball, soccer, and track and field.
- Provides a high-intensity cardio workout in a short period, making it time-efficient.
- Enhances coordination and balance, skills that are transferable to various athletic endeavors.
Tips:
- Land softly to minimize impact on your joints.
- Keep your core engaged throughout the exercise to maintain stability.
- Try to achieve maximum height with each jump, pushing through your heels and using your arms for momentum.
Great, you’ve got a solid arsenal of horse stance alternatives to elevate your leg training. Ready for more insights? Let’s dive into some frequently asked questions.
Horse Stance FAQs
Do you have a question about the horse stance exercise? No problem, because we’ve got the answers!
1. What is a good time target for the horse stance exercise?
While it’s reported that Shaolin Monks can hold a horse stance for as long as an hour, most fitness enthusiasts should set their sights on a less challenging target. First, work up to maintaining a perfect horse stance for one minute.
When you can do multiple sets of one minute, gradually work up to three minutes and then five. Five minutes is an excellent goal for most people – challenging but achievable.
Going beyond five minutes will take considerable dedication and effort. It may be unnecessary for most exercisers, and the cost probably outweighs the benefits. For the majority, aiming for a 3-5 minute hold will be more than sufficient, but if you’re eager to push your limits, a ten-minute hold could be your next challenge.
2. Should my feet be parallel or turned slightly outward when doing the horse stance?
Both angled and parallel feet are accepted techniques for the horse stance. In general, angled feet are a little more joint-friendly and make it easier to descend to 90 degrees at the hips and knees. However, angled feet also open your hips more and increase abductor and adductor engagement, which may be a good or bad thing, depending on your goals.
In contrast, a parallel stance is more quadriceps-centric, but you’ll need above-average flexibility to achieve the required depth. You may also feel the exercise more in your knee joints.
Try both and see which you prefer. Still can’t choose? Alternate between the two stances workout by workout.
3. In terms of progression, how should I program the horse stance into my workouts?
The horse stance is a simple exercise, and there is no need to overthink it. Stand with your feet wide apart, squat down, and hold – that’s it! But, if you want to get better at the horse stance, i.e., work up to holding it for longer, a more structured approach will probably produce better results.
So, do a single set of horse stance and see how long you can hold it. Then, calculate 70% of that time and, for subsequent workouts, do three sets of that duration with 1-2 minutes rest between each one. So, if you manage an all-out set of two minutes and 15 seconds (135 seconds), you should do sets of 95 seconds.
Then, week by week, add ten seconds to each set. As you near your goal, e.g., five minutes, reduce the number of sets to two and finally one. Then, on reaching your goal, calculate 70% of your new personal record and repeat the process.
4. How many times a week should I do the horse stance?
Horse stance frequency depends on your goals. If you are primarily interested in improving your mobility, you can do this exercise daily. Take your set to the point of mild discomfort to avoid overtaxing your muscles.
However, if you want to increase your performance in the horse stance and progress to longer holds, you should take your sets closer to failure and do three dedicated workouts per week, e.g., Monday, Wednesday, and Friday. Have a day of rest between each workout for recovery and adaptation.
But, if you want to do the horse stance every day, you should combine these options and alternate hard and easy workouts, e.g., Monday – three sets close to failure, Tuesday – one less intense set, etc.
5. I can’t get my thighs down to parallel – what should I do?
Not being able to reach parallel in the horse stance suggests you have tight adductors and hamstrings. Practicing regularly will help make your muscles more flexible. Descend as deep as you can without forcing the movement or straining. In time, you’ll be able to sit with your thighs parallel to the ground.
In the meantime, make sure you also stretch your adductors and hamstrings every day.
For your adductors:
- Sit on the floor with your legs bent and the soles of your feet together. Sit up tall and rest your elbows on your knees.
- Gently push down on your knees to open your hips.
- Hold for 30-60 seconds.
For your hamstrings:
- Lie on your back with your legs straight. Lift one leg up and loop a belt or yoga strap over the ball of your foot.
- Gently pull your leg toward vertical until you feel tension in the back of your thigh.
- Hold for 30-60 seconds, and then switch sides.
These stretches complement your horse stance training and make it easier to hit the correct depth.
6. Will doing the horse stance give me bigger thighs?
While doing the horse stance will undoubtedly improve your lower body muscular endurance and mobility, it probably won’t noticeably increase the size of your thighs, at least directly. It’s not that type of exercise.
However, doing the horse stance could indirectly help you build more muscular legs by improving your range of motion so you can squat deeper, and your mental toughness and determination so you can put more into your leg workouts.
So, while doing the horse stance probably won’t lead to bigger thighs, it could make your leg-building workouts more effective.
7. Is the horse only beneficial for martial artists?
While the horse stance originates in the martial arts, it offers a wide range of benefits for everyone who practices it, including athletes, general fitness enthusiasts, and anyone who wants to build a more enduring, mobile lower body and resilient mind.
In fact, there are examples of horse stance variations in yoga (the Goddess Pose or Utkata Konasana) and in Pilates (the sumo and plie squat). And then there’s the sumo deadlift in powerlifting. While the demands and techniques of each of these exercises vary, they all involve a deep knee bend from a wide stance.
Just because the horse stance has its roots in activities like Kung Fu and Karate doesn’t mean it’s only good for fighters. In fact, the wide-ranging benefits of the horse stance mean it’s good for everybody’s body!
Horse Stance – Wrapping Up
The horse stance is a traditional leg conditioning exercise from the martial arts. Fighting styles all over the world use this exercise to develop muscular endurance, joint mobility, and mental toughness. Requiring no equipment, it’s the perfect excuse-free lower body workout and ideal for home exercisers as well as gym dwellers.
While the horse stance may look easy, holding it for more than a couple of minutes is very challenging, and you’ll quickly learn doing this exercise requires some mind over matter. But, as you progress from one minute to three or even five, you’ll feel an immense sense of accomplishment; this is a very rewarding exercise.
However, don’t just do it once and dismiss it. The transformative power of the horse stance lies in doing it several times a week and training to increase the duration of each hold. As your muscles get stronger, so too will your mind.
So, make the horse stance part of your leg workouts and enjoy all the benefits this traditional exercise has to offer. Stick with it; you will be rewarded!
References:
1 – Edwards JJ, Deenmamode AHP, Griffiths M, et al. Exercise training and resting blood pressure: a large-scale pairwise and network meta-analysis of randomized controlled trials. British Journal of Sports Medicine Published Online First: 25 July 2023. doi: 10.1136/bjsports-2022-106503
Interested in measuring your progress? Check out our strength standards for Hip Abduction, Bulgarian Split Squat, Deadlift, and more.




Excellent article!!!!!!
Muchas gracias.
Thanks Douglas – glad you enjoyed the article and I hope you found it useful.