In general, there are two ways to do any exercise – the right way and the wrong way.
The right way is safe and effective and puts most of the tension on the muscles you want to develop. It optimizes your training time and minimizes your risk of injury. In short, it’s the best way to work out.
On the other hand, the wrong way takes tension away from the target muscles. It puts potentially harmful stress on other parts of your body, usually nearby joints, ligaments, and tendons. It makes your workouts less effective and could lead to injury.
Your time, health, and energy are valuable commodities, and you should use them wisely. That means, when given a choice, you should perform the exercises in your workouts with the best possible technique. That way, you’ll get better results from less training time and effort.
Any exercise can be performed badly, but the plank is one of the most common victims of poor training technique. Despite being one of the most popular exercises, it’s one that many people cannot do correctly.
It’s time to fix this!
In this article, we explain why and how to plank properly.
Plank Basics
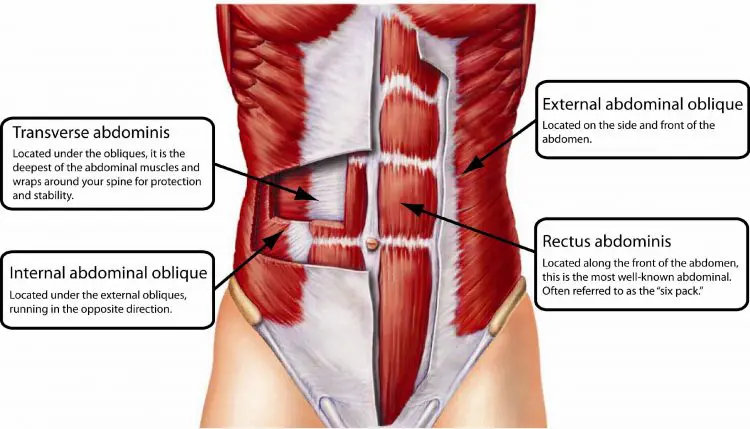
The plank is an isometric or static core exercise with roots in yoga and Pilates. The core is the collective term for the muscles of your midsection, including:
- Rectus abdominus
- Obliques
- Transverse abdominis
- Erector spinae
- Multifidus
- Pelvic floor
- Diaphragm
In addition, planks work your quadriceps, glutes, chest, shoulders, upper back, and arms, albeit to a lesser degree.
Unlike exercises like crunches and sit-ups, the plank involves no movement. As such, it teaches you to use your core muscles as they often work in nature, i.e., as stabilizers. Planks are best thought of as an anti-extension exercise, meaning you use your muscles to prevent the extension of your lower back.
Planks are generally performed for time, i.e., 30-60 seconds per set. As you get stronger, you should strive to hold the plank position for longer. However, you can also make planks more challenging by tensing your core muscles harder or using one of several plank variations – discussed later in this article.
Common Planking Faults
For such a seemingly simple exercise, there are a lot of things that can go wrong with planks. The most common planking faults you need to avoid are:
1. Not bracing your core
Planks are a core bracing exercise, yet many people fail to engage their core muscles correctly. To brace your core, tense your abs like you are expecting a punch in the stomach. Don’t pull your abs in. Instead, just squeeze them tight.
Next, inhale down into your abdomen. You should feel your core stiffen and solidify.
Maintain this tension while taking shallow breaths. Good job – you are braced!
Your core should be braced whenever you plank. Bracing correctly will not only make your planks more effective but will also eliminate many of the most common planking faults discussed below.
2. Lifting your butt
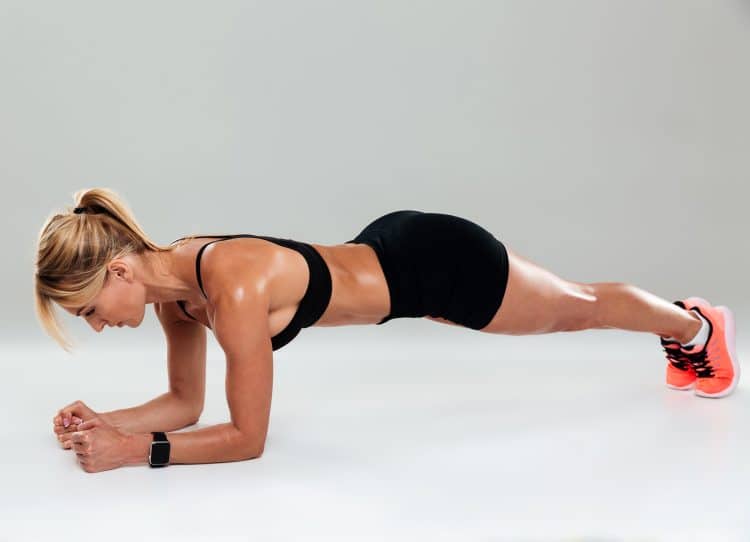
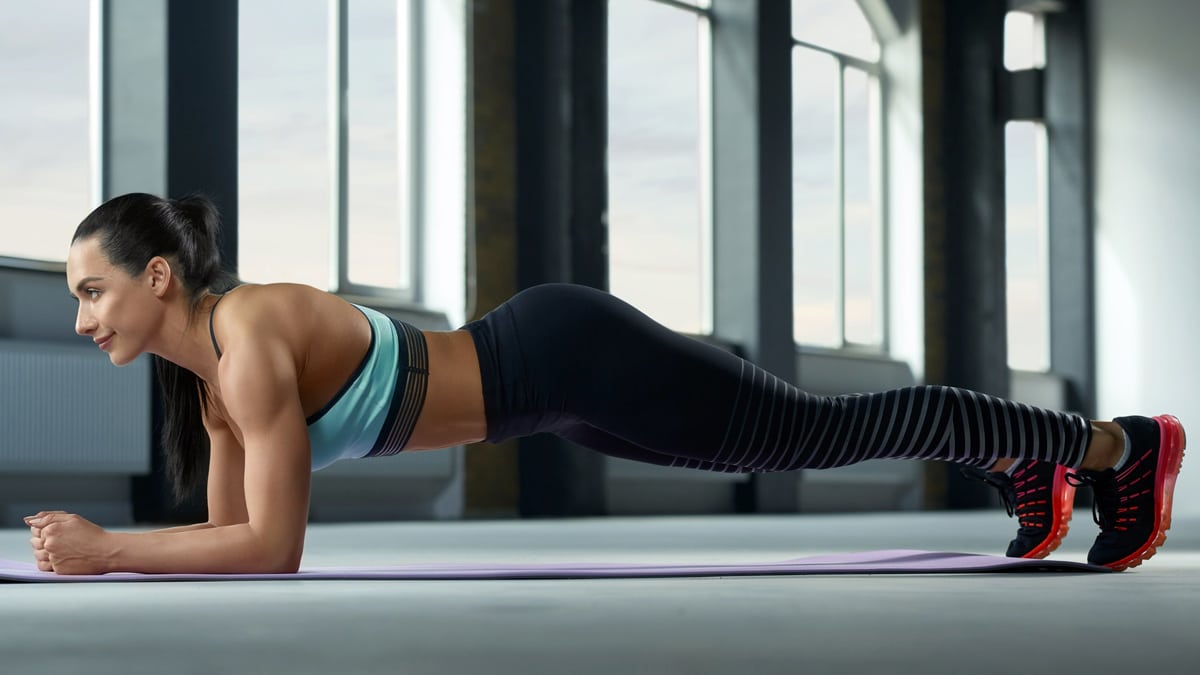
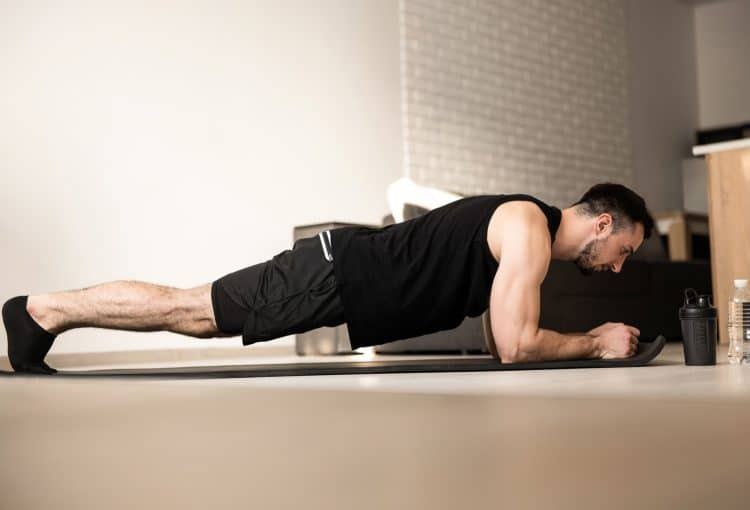
Your body should be perfectly straight during planks. Your shoulders, hips, and feet should form a nice, neat line. Lifting your hips makes planks a little easier and puts more stress on your lower back. Weak abs or trying to hold a plank for too long can result in butt lifting.
3. Dropping your hips
Leading on from the point above, dropping your hips out of alignment also suggests your abs are weak or you’ve held your plank for too long. Dropped hips put your lumbar spine into an extended position, which could cause severe back pain.
Remember, the plank is an anti-extension exercise, and dropping your hips means your muscles are failing to perform their job.
4. Lowering your head toward the floor
Just because your body is straight doesn’t mean you can forget about your head and neck position. The neck is part of your spine and needs to be correctly aligned to minimize your risk of injury. After all, it’s responsible for supporting your head, which is pretty heavy.
Your head and neck should be neutral during planks, so your ears should align with your shoulders. Gently tuck your chin in and imagine you are pointing the top of your head forward to get your neck into the correct position. Look straight down at the floor throughout your set.
5. Raising your head
It can be very tempting to lift your head and look forward during planks, especially if you’re doing them in front of a mirror. Like dropping your hips, this puts a lot of stress on your joints.
Keep your chin tucked in and your neck long to avoid this fault. If you can’t avoid looking in the mirror during planks, turn around so you won’t be able to see your reflection.
6. Holding your breath
It’s very easy to forget to breathe during planks. You’re so busy thinking about your core that breathing just slips your mind! Unfortunately, not breathing robs your muscles of the oxygen they need to function. It can also cause your blood pressure to rise dangerously high.
You won’t be able to breathe normally during planks, as doing so could limit bracing strength. However, you should take small, shallow breaths into your abdomen throughout your set.

7. Not tensing the rest of your body
While planks are undeniably a core exercise, they also involve your legs and arms – or they should! As such, you should contract your entire body when you perform planks to ensure your body remains tight and properly aligned.
Mentally scan up and down your body whenever you do planks, making sure your arms, shoulders, chest, glutes, and legs are contracted, and not just your abs. Planks should feel like a full-body exercise.
8. Being too focused on the time
Planks are usually prescribed by time but being too focused on time can cause problems. For example, if your program calls for a 40-second plank, but your core is tired after 25 seconds, you could find yourself using improper form to get to the end of your set.
So, rather than hold your planks for a predetermined time, do them for as long as possible while maintaining proper form. Your plank duration will naturally increase as you get stronger.
9. Planking for longer and longer durations
The current world record for holding a plank is an incredible 9 hours and 30 minutes (1). While this is a tremendous feat of muscular endurance, such long-duration planks are not a good use of your training time.
There are lots of long-duration plank challenges on social media right now, but the reality is that there are better ways to train your core. If you can do any strength training exercise for five minutes or more, it’s probably not hard enough to do you any good.
So, if you can hold a strong plank for 60-90 seconds, it’s time to try a more demanding variation instead of going for longer and longer times.
Proper Plank Form
So, now you know what common planking faults you need to avoid, let’s take a look at how to do planks correctly. Follow these steps and plank with picture-perfect form!
- Kneel down and place your forearms on the floor. Your elbows should be directly below your shoulders and your upper arms vertical. Clasp your hands together or leave your forearms parallel as preferred.
- Brace your core.
- Walk your feet out and back until your body is as straight as a plank. Tense your legs, glutes, chest, shoulders, and arms, as well as your core.
- Hold this position, but not your breath, for as long as you can. Keep your core braced and muscles tensed throughout. Do not allow your hips to lift or drop.
- At the end of your set, bend your legs and lower your knees to the floor.
- Perfect plank – well done!
Plank Variations and Progressions
The standard front plank is an excellent exercise. However, it’s not the only way to do planks. Here are some variations and progressions to try. Use these moves to add variety to your core workouts.
1. Kneeling Plank
Contrary to what many people think, the plank is NOT an easy exercise, especially when you perform it correctly. As such, some people may find planks too challenging or cannot do them with good form.
One solution is to do kneeling planks. This shortens the distance between your bases of support and takes weight off your core. Kneeling planks are an excellent option for beginners and deconditioned exercisers.
Steps:
- Kneel down and place your forearms on the floor. Your elbows should be directly below your shoulders and your upper arms vertical. Clasp your hands together or leave your forearms parallel as preferred.
- Brace your core.
- Move your knees back until your body is straight.
- Hold this position, but not your breath, for as long as you can. Keep your core braced and muscles tensed throughout. Do not allow your hips to lift or drop.
- At the end of your set, bend your legs and lower your knees to the floor.
Tips:
The closer your knees are to your elbows, the easier this exercise becomes. Adjust the position of your knees according to your core strength, moving your legs further back as you get stronger.
2. High Plank
Planks are traditionally performed while resting on your elbows. As such, you’ll need a flat floor and preferably a mat so you can do them comfortably. That’s okay if you train at home or in a gym, but it could be a problem if you exercise outdoors.
You don’t need a mat for high planks, and, as an added benefit, they also provide your arms, shoulders, and chest with more of a workout.
Steps:
- Kneel down and place your hands on the floor, so they’re about shoulder-width apart. Your hands should be directly under your shoulders with your arms straight and vertical. Point your fingers forward and your elbows backward. Imagine you are screwing your hands into the floor.
- Brace your core.
- Walk your feet out and back until your body is as straight as a plank. Tense your legs, glutes, chest, shoulders, and arms, as well as your core.
- Hold this position, but not your breath, for as long as you can. Keep your core braced and muscles tensed throughout. Do not allow your hips to lift or drop.
- At the end of your set, bend your legs and lower your knees to the floor.
Tips:
You can also do high planks while resting on your knees. This makes them considerably more manageable and ideal for novice or deconditioned exercisers.
3. Bear Plank
Most plank variations involve keeping your legs straight or, at least, your knees extended behind your hips. Bear planks are a little different in that your knees are kept directly below your hips throughout.
This doesn’t mean they’re any better than regular planks – they’re just different. But, when trying to avoid training ruts and plateaus, different is good!
Steps:
- Kneel on all fours so your hands are directly under your shoulders and your knees are under your hips. Your arms should be straight with your fingers pointing forward and hands about shoulder-width apart.
- Brace your core and pull your toes up, pressing the balls of your feet into the floor.
- Lift your knees an inch or so off the floor.
- Hold this position (but never your breath) for as long as possible.
Tips:
Make this exercise more challenging by doing bear crawls. With this exercise, you adopt the bear plank position and then slowly crawl forward and backward to increase the stability demand on your core.
4. Hollow Body Plank
Planks are probably so-called because, when you do them, your body should be as straight as a plank. However, the hollow body plank is slightly different. For this exercise, you must purposely flex your spine, so your body forms a shallow C-shape.
The hollow body plank is a gymnastics exercise. It provides a progression from regular planks as your abs will have to contract harder to maintain the new body position.
Steps:
- Kneel on all fours, so your arms are straight, hands roughly shoulder-width apart. Rotate your elbows back and in toward your ribs.
- Brace your core.
- Lift the middle of your back up toward the ceiling. Drive your hands into the floor and push your shoulders forward into protection.
- Maintaining this curved position, walk your feet out and back into a plank.
- Hold this position for as long as you can, without holding your breath, of course!
Tips:
Remember to engage your arms, shoulders, chest, glutes, and legs during this exercise. While hollow body planks ARE mostly a core exercise, you’ll get more from them if you engage the rest of your body. After all, the core never works alone!
5. Plank Shoulder Taps
Planks are mostly done statically, i.e., with no movement. This means they’re generally done for time instead of reps. Plank shoulder taps are not static, so they can be prescribed for reps, which may make them more convenient if you don’t have a watch or clock to time your set. This variation also increases oblique engagement, which are basically your waist muscles.
Steps:
- Adopt the high plank position (exercise #2) with your arms and legs straight and core braced.
- Lift your left hand off the floor and touch your right shoulder.
- Return your hand to the floor and then touch your left shoulder with your right hand.
- Continue touching your shoulders with the opposite hand for the duration of your set.
Tips:
Make sure you keep your hips and shoulders level throughout – twisting is cheating and means you core isn’t as braced as it should be. Bend your legs and rest on your knees to make this exercise easier and more suitable for beginners.
6. Single-arm Plank
If you’ve mastered the regular plank and can comfortably hold one for 60-90 seconds, you are probably ready for a more challenging exercise. Single-arm planks are significantly harder than standard planks and put much more stress on your obliques.
Steps:
- Adopt the regular plank position with your weight resting on your forearms and feet only. Your body should be perfectly straight, and your core braced.
- Shift your weight onto one arm and place your other arm down by your side so you are balancing on three points of support only. Keep your hips and shoulders level, and don’t lift or lower your butt.
- Hold this position for the required duration.
- Switch arms set by set.
Tips:
Place your feet closer together to make this exercise harder or wider apart to make it easier. You can also bend your legs and rest on your knees to make single-arm planks more accessible for beginners.
7. Bird Dog Plank
Once you’ve mastered the single-arm plank, you could be ready for an even more demanding core workout. The bird-dog plank involves supporting your weight on one arm and one leg, making it the ultimate planking challenge. Only attempt this exercise if you are completely comfortable with the easier plank variations outlined in this article.
Steps:
- Adopt the high plank position (exercise #2). Brace your core and tense your legs, arms, chest, and shoulders.
- Lift your left leg and right arm up, so they’re parallel to the floor.
- Lower your arm and leg, swap sides, and repeat.
- Continue for the desired number of reps.
Tips:
You can make this exercise harder by wearing ankle and wrist weights. Alternatively, you can make it easier by bending your legs and resting on your knees, i.e., the quadruped bird-dog exercise:
Plank Form FAQs
Do you have a question about planks or core training in general? Don’t worry – we’ve got the answers!
1. Will planks give me a six-pack?
While planks will strengthen your core, they won’t magically burn the fat that covers your abs. Instead, you need to combine core training with a healthy diet to develop a six-pack. That said, planks and their variations are an effective way to build stronger, more prominent core muscles, but you’ll need to lose some belly fat if you want to see your core muscles.
2. Do planks burn belly fat?
Planks do burn calories and fat, but not necessarily from your belly. Sadly, there is no such thing as spot reduction. Your body stores and burns fat globally, and not just from the areas you exercise.
So, to lose belly fat, you’ll need to exercise your entire body and lose fat from all over.
3. Planks hurt my back – what’s going on?!
If planks hurt your back, you are probably doing something wrong. The most likely cause is letting your hips drop down toward the floor, as this puts a lot of stress on your lumbar spine.
Video yourself planking and look for performance faults. Fix what you see, and you should find that your back is no longer a problem. However, if you still have back pain when planking, you may have an underlying injury and should seek medical advice.
4. How long should I plank for?
It’s generally best to plank for as long as possible, ending your set when your form starts to deteriorate. However, suppose you can hold a plank for more than a couple of minutes. In that case, it’s probably too easy to be beneficial, and you should try and more demanding variation rather than plank for even longer.
While long-duration planks are impressive, they are not very time efficient, and there are better, more effective ways to develop a stronger core.
One way to make planks more challenging is to tense your core harder. Doing this could reduce your planking time to as little as 20-30 seconds per set. This is called the Russian kettlebell challenge or hardstyle plank.
Read more about RKC planks here.
5. Can I wear a weighted vest to do planks?
Yes indeed! Weighted vest planks are a great way to make your core workout more challenging and increase the load on your muscles gradually and progressively. You can also make planks harder by resting a weight plate across your hips or getting a training partner to do it for you.
However, weighted planks put more stress on your lower back, so they’re best left to fit experienced exercisers with no history of back pain.
Plank Form – Closing Thoughts
Planks are a widely performed exercise, but many people don’t do them correctly. That’s a shame because, when done right, the plank is a very powerful move for building a stronger core.
If you can’t feel planks working or they hurt your back, there is a good chance that you’re doing them wrong.
Use the information in this article to analyze your plank performance and learn how to plank correctly. Then, once you’ve mastered the plank, you can add variety to your core workouts with the seven variations and alternatives provided.
Reference:
1. Guinness World Records: Longest plank record smashed with a staggering new time https://www.guinnessworldrecords.com


