There are over 600 muscles in the human body, and each one works in synergy with its neighbor to control your movements. Muscles are made of bundles of fibers and controlled by nerves called motor neurons. Sensory nerves tell you the position of your muscles so you can control them without even looking.
It’s really quite amazing!
But, despite this complexity, your muscles are also pretty dumb. For example, they can’t tell the difference between doing push-ups for your pecs or working out on a state-of-the-art chest press machine.
Ultimately, your muscles just know tension and time, and by manipulating these two variables, you can build size and strength using almost any type of workout equipment.
That’s one of the reasons that calisthenics is such a great workout – you can train anywhere and anytime, using only your body weight for resistance.
The most significant advantage of calisthenic training is also its main disadvantage – your body weight. Your weight could make some exercises impossible to do correctly, especially if you are a beginner.
Level Up Your Fitness: Join our 💪 strong community in Fitness Volt Newsletter. Get daily inspiration, expert-backed workouts, nutrition tips, the latest in strength sports, and the support you need to reach your goals. Subscribe for free!
But, the good news is that changing the angle of your body or otherwise modifying your technique can make almost any bodyweight movement more manageable.
In this article, we discuss the wall push-up, explaining why and how to do it, and how to progress your training as you get stronger.
Wall Push-Ups – Muscles Worked
Wall push-ups are a compound exercise. This means they involve two or more joints and several muscles working together. In fact, wall push-ups are virtually a full-body exercise!
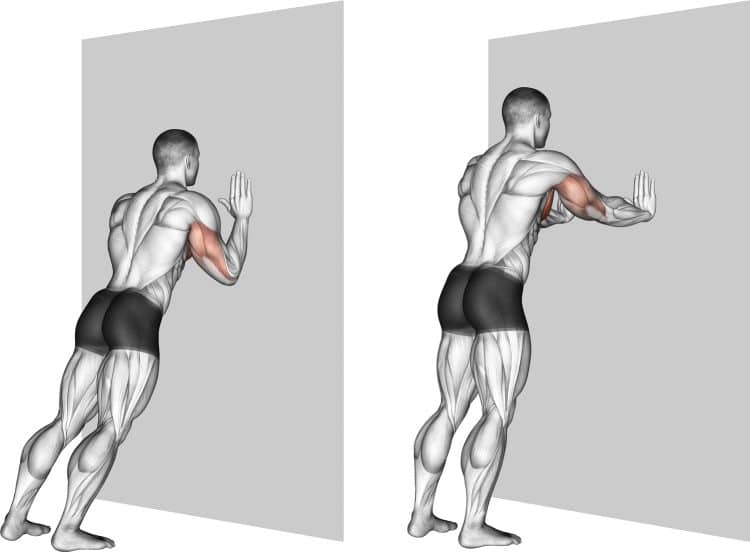
The primary muscles trained during wall push-ups are:
Pectoralis major – known as the pecs for short, these are the muscles located on the front of your chest. The pecs have three main functions: shoulder adduction, shoulder horizontal flexion, and shoulder medial rotation.
Deltoids – the deltoids are your shoulder muscles. Known as the delts for short, there are three sets of fibers called heads in this muscle: anterior (front), medial (side), and posterior (rear). All three deltoid heads are involved in wall push-ups, but the anterior head is the most active.
Rotator cuff – located deep inside your shoulder, the rotator cuff controls and stabilizes your shoulder joint during wall push-ups. The rotator cuff muscles are the supraspinatus, infraspinatus, teres minor, and subscapularis.
Triceps – located on the back of your upper arm, the triceps are responsible for elbow extension during wall push-ups. The triceps often fatigue first during push-ups, so you may feel this muscle working more than the pecs and delts.
Serratus anterior – located on the side of your lower chest, the serratus anterior is so called because it looks like the edge of a serrated or saw-tooth blade. During push-ups, this small but important muscle keeps your shoulder blades flat against your ribs.
Core – you must use the muscles of your core to stabilize your spine during wall push-ups. The core is the collective term for your rectus abdominis, obliques, transverse abdominis, and erector spinae. These muscles surround your midsection like a weightlifting belt to create intra-abdominal pressure, which supports your spine from within.
How to Do Wall Push-Ups
Get more from wall push-ups while keeping your risk of injury to a minimum by following these guidelines:
- Stand about an arms’ length from a wall. Place your palms flat on the wall with your arms straight, and shoulders pulled down and back. Your hands should be slightly wider than shoulder-width apart, fingers pointing upward.
- Without moving your hands, rotate your elbows outward to increase shoulder stability and engage your upper back.
- Brace your abs and take a small step back, so you are leaning against your hands. Do not let your hips drift forward, which would put unwanted stress on your lower back.
- Bend your arms and lower your nose toward the wall. Stop just short of touching the wall, or let it touch lightly as you wish.
- Push yourself away from the wall and back up to full arm extension.
- Repeat for the required number of reps.
Note: The further you move your feet away from the wall, the more weight you’ll put on your arms and the more challenging the exercise will be, so adjust your feet accordingly.
Wall Push-Up Benefits and Drawbacks
Do wall push-ups deserve a place in your workouts? Consider the following benefits and then decide!
1. Anywhere, anytime
Wall push-ups are the ultimate excuse-free workout as you don’t need any special equipment to do them. In fact, you could probably go and do a set right now! If lack of time or facilities makes working out inconvenient for you, wall push-ups are a good solution.
2. A steppingstone to regular push-ups
Regular push-ups involve lifting about 50-60 percent of your weight with just your arms. This could be too challenging for some people, especially calisthenics beginners. Wall push-ups put much less strain on your arms, so they’re the ideal way to build your strength before progressing to full push-ups.
3. A useful warm-up exercise
Instead of diving straight into a set of full push-ups, use wall push-ups to warm up your chest and shoulders. If you have sore joints or can only do a few full push-ups, warming up with wall push-ups could make your workout more comfortable and enjoyable.
4. Use them as a mechanical drop set
Do push-ups beyond failure by switching to wall push-ups after regular floor push-ups. Extending your set this way will make your workout more intense and potentially more productive for building strength and muscle mass.
While wall push-ups are a mostly beneficial exercise, there are also a few drawbacks to consider:
Level Up Your Fitness: Join our 💪 strong community in Fitness Volt Newsletter. Get daily inspiration, expert-backed workouts, nutrition tips, the latest in strength sports, and the support you need to reach your goals. Subscribe for free!
1. Very low overload
Wall push-ups don’t put a lot of weight on your arms. This is an advantage for some people but a drawback for others. If you are already quite strong, wall push-ups may be too easy to be productive, and you’ll need to choose a more challenging variation.
9 Wall Push-Up Variations and Alternatives
Wall push-ups are a highly effective upper body exercise, but that doesn’t mean you need to do them all the time. There are several variations and alternatives you can use to keep your workouts productive and interesting:
1. Box push-ups
Box push-ups put more weight on your hands than wall push-ups, but not as much as full push-ups. This exercise is a decent step up from wall push-ups, but it is still suitable for beginners who aren’t ready for the regular variation.
How to do it:
- Kneel down so your hips are directly over your knees and your shoulders are over your hands.
- Place your palms flat on the floor, so your fingers point forward, and your hands are about shoulder-width apart. Brace your abs to stabilize your lower back.
- Bend your arms and lower your chest to the floor. Take care not to hyperextend your spine.
- Push yourself back up and repeat.
2. Three-quarter push-ups
With three-quarter push-ups, your knees are further back, putting more weight on your hands. You’ll also need to work a little harder to stabilize your spine, so expect to feel this exercise more in your abs than with box push-ups.
How to do it:
- Kneel down on the floor and place your hands flat, roughly shoulder-width apart.
- Move your knees back until your body is straight, but your legs are still bent. Your weight should be on your hands and the front of your lower thighs. Brace your abs.
- Bend your arms and lower your chest to the floor, taking care not to hyperextend your lower back.
- Push yourself back up and repeat.
3. Band-assisted push-ups
With band-assisted push-ups, you use a resistance band to offset some of your body weight to make the exercise easier. Start with a strong band and then progress to a weaker one as you get better at the exercise. Gradually wean yourself off the band until you can do full push-ups unaided.
How to do it:
- Stretch a resistance band between the uprights of a squat rack or similar. The band should touch your chest when you are in the top of your push-up.
- Place your hands on the floor and adopt the push-up position with the band beneath your chest.
- Bend your arms and lower your chest to within an inch of the floor.
- Push yourself back up to full arm extension and repeat.
4. Regular push-ups
After doing the previous three exercises, you should now have the strength necessary to do at least a few full push-ups. Of course, that doesn’t mean you should quit those easier variations. In fact, it’s probably best to continue doing them until you feel you have truly mastered doing regular push-ups.
How to do it:
- Squat down and place your hands on the floor, shoulder-width apart and fingers pointing forward.
- Walk your feet back until your body is straight. Brace your abs and pull your shoulders down and back. Rotate your arms outward to engage your upper back and stabilize your shoulders.
- Without letting your hips rise or drop, bend your elbows and lower your chest down to within an inch of the floor. Keep your body straight.
- Do NOT drop your head but, instead, maintain good alignment of your neck.
- Drive your hands into the floor and push yourself back up to arms’ length.
- Continue for the required number of reps.
5. Decline push-ups
Where wall, box, and three-quarter push-ups put less weight on your arms, decline push-ups do the opposite. If you can do push-ups with good form and need a more challenging exercise, decline push-ups could be the perfect exercise for you.
How to do it:
- Stand with your back to a 4 to 18-inch box or bench. The higher you raise your feet, the more weight you’ll put on your arms, and the more challenging the exercise becomes.
- Adopt the push-up position with your arms, legs, and body straight. Brace your core and rotate your elbows outward to stabilize your shoulders.
- Bend your arms and lower your chest to the floor. Do not hyperextend your spine.
- Drive your hands into the floor and push yourself back up to arms’ length.
- Continue for the required number of reps.
6. Deficit push-ups
Deficit push-ups take your muscles and joints through a larger range of motion, making them considerably more challenging than other types of push-ups. You can use push-up handles, yoga blocks, stacks of weight plates, dumbbells, or even a couple of bricks for this exercise.
How to do it:
- Place your blocks, handles, etc., on the floor roughly shoulder-width apart. Put your hands on them, and then adopt the push-up position. Your body should be completely straight. Brace your core and pull your shoulders down and back.
- Next, bend your elbows and lower your chest down between your hands. Get a slight stretch in your chest.
- Drive your hands into the floor and push yourself back up to arms’ length.
- Continue for the required number of reps.
7. Chest press machine
Push-ups aren’t for everyone, and that’s okay! You can train your chest and triceps without resorting to bodyweight exercises if you prefer. The chest press machine is arguably the most straightforward chest, shoulder, and triceps exercise around.
How to do it:
- Adjust the seat so that the handles are approximately chest height.
- Sit on the machine and hold the handles with an overhead grip. Your hands should be slightly wider than shoulder-width apart. Some machines have foot pedals to help you lift the weights, making it easier to grasp the handles. Use this function if it’s available.
- Keeping your head up and your lower back slightly arched, press the handles away from you until your arms are straight but not fully locked. Locking your elbows puts a lot of strain on your joints.
- Bend your arms and lower the weights as far as your flexibility allows. Do not over-extend your shoulders as this can lead to injury.
- Keep your movements smooth and slow, taking 2-3 seconds to lift the weight and the same time to lower it. This will ensure your muscles do all the work and momentum doesn’t take over.
8. Barbell and dumbbell bench press
You can train your chest with barbells or dumbbells, collectively called freeweights. Unlike resistance training machines like the chest press, you’ll need to work a little harder to stabilize the weights, making these exercises more demanding and also more effective.
Learn how to do barbell bench presses here and dumbbell bench presses here.
9. Cable chest press
Cable chest presses are an excellent alternative to freeweight bench presses and are more functional than a regular chest press machine. This is a great movement for improving shoulder and core stability while you work your pecs, deltoids, and triceps.
Learn how to do cable chest presses here.
More related resources:
- 12 Reasons To Do Push-Ups Every Day
- Press-Up Vs. Push-Up – What’s the Difference?
- Push-up Board — How To Use, Benefits, and Workouts
- Calories Burned Push-Ups Calculator
- 15 Intense Push-Up Variations for Bodybuilders
- Deficit Push-Ups – Muscles Worked, How-To, Benefits, and Alternatives
- Bench Press vs Push Ups: Which One Should You Do?
- Hand-Release Push-Ups Exercise Guide
- Knuckle Push-Ups: Muscles Worked, How-To, Benefits, and Drawbacks
Wall Push-Ups – Wrapping Up
If you want to tone and strengthen your chest, shoulders, and triceps, push-ups are hard to beat. But, as convenient as regular push-ups clearly are, they may be too demanding for some people.
The good news is that you don’t HAVE to do full push-ups and can get an effective workout with easier push-up variations, such as wall push-ups, three-quarter push-ups, and band-assisted push-ups.
So, regardless of your current level of fitness and strength, it’s good to know that push-ups can always be part of your workouts, and you can use them to work your upper body anywhere and anytime!
Interested in measuring your progress? Check out our strength standards for Bench Press, Push Ups, Dumbbell Bench Press, and more.


