Rack pull vs. deadlift has been a hot debate for a while now. But the truth of the matter is, they both have pros and cons. Not to mention, there is such a thing as exercise preference of which some people will prefer one over the other (or neither which is completely fine).
However, you can only benefit from the deadlift and rack pull if you include them in your training. Not sure how to? Don’t worry, we’ve got you covered.
If you want a huge, strong back, mountainous traps, powerful glutes, and hamstrings, a jacked core, and an iron grip, well, few exercises can beat heavy pulls.
In this guide, we’ll go into detail about each movement and by the end, you should be able to incorporate either or both into your training and see some serious gains.
First, here’s a short description of both exercises to get you better acquainted.
Rack Pull
The rack pull focuses more on the top half or top 3/4 of the deadlift.
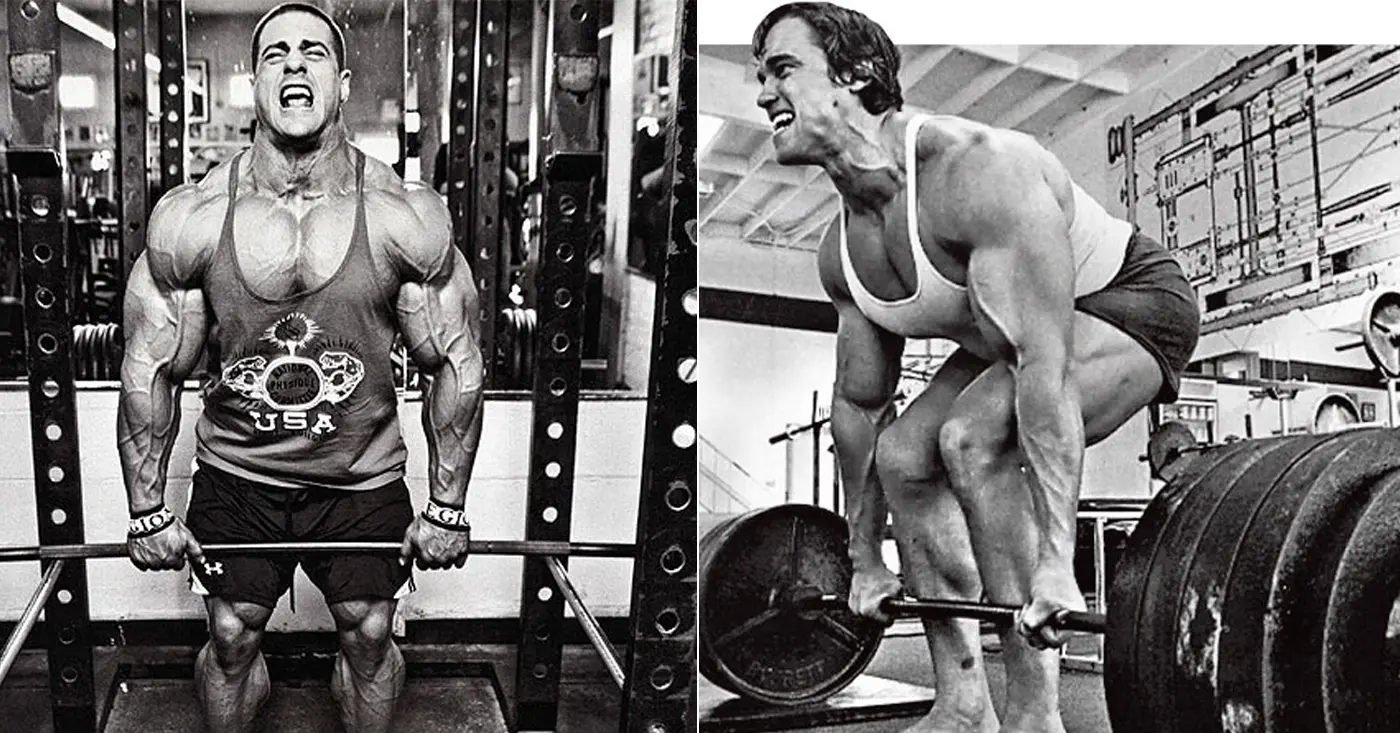
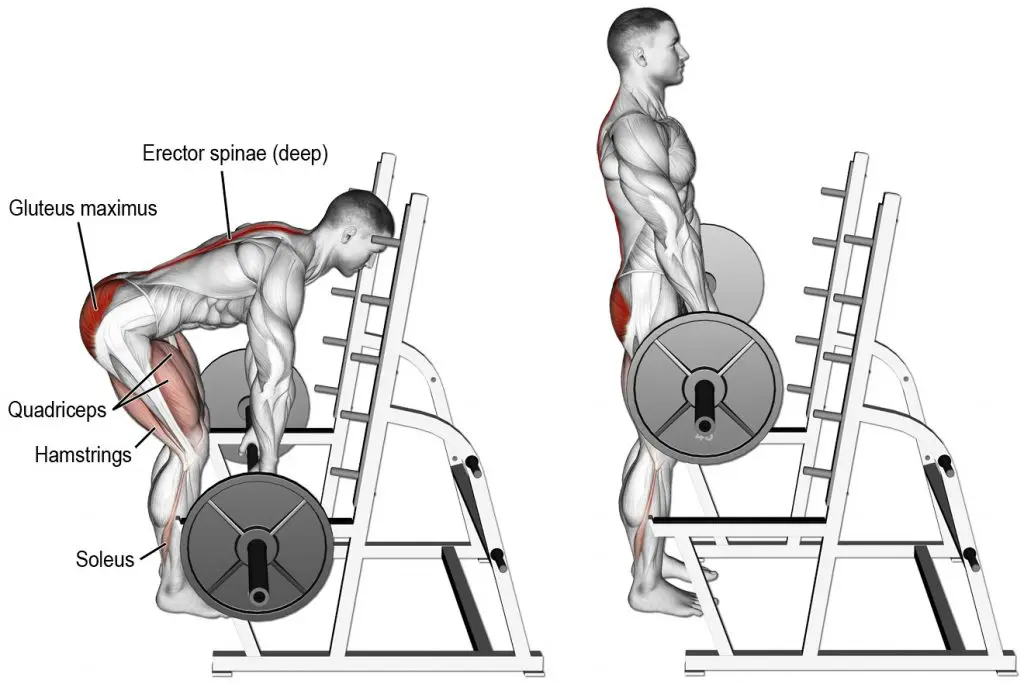
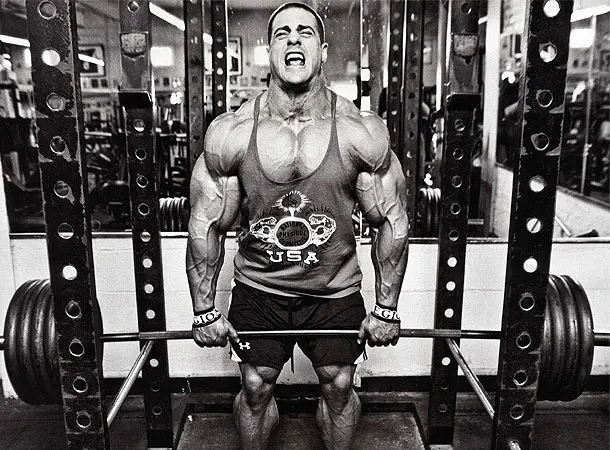
This movement typically starts with the loaded barbell/weight set up above, at, or below the knees, and elevated off the ground. The lifter pulls the bar up along the body until they’re in an upright standing position.
A power rack is the most common piece of equipment used for rack pulls, but the Smith machine, blocks, and anything that allows a shorter range of motion is also often used.
Because the setup is different than with the deadlift, it also requires a different technique of which we will go over shortly.
Deadlift
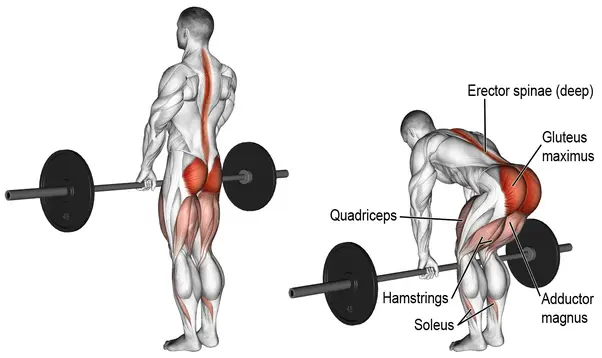
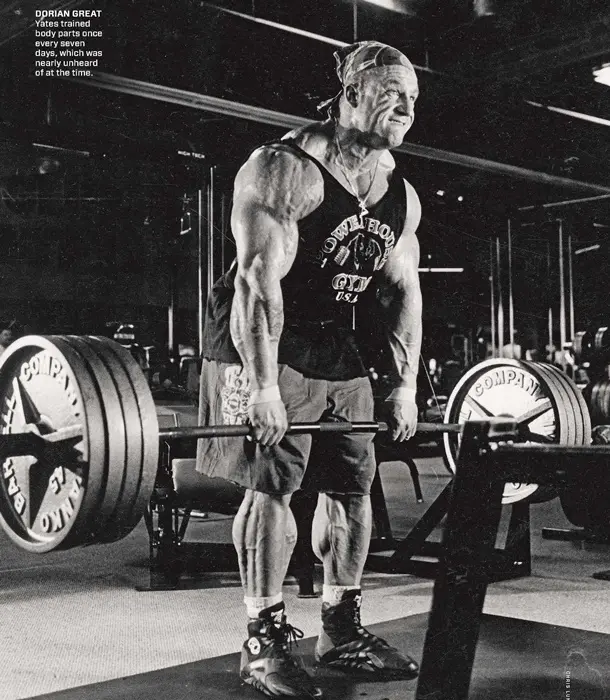
The deadlift involves pulling the loaded barbell/weight from the floor into the standing position or close to it. The conventional deadlift typically allows for more variety in how it can be performed (e.g. variations, training tools).
It’s also a little more involved than the rack pull, and consequently, engages your entire body a little differently. We’ll explain the ideal technique for the deadlift in a moment.
Rack Pull vs. Deadlift Similarities
These two compound lifts have a lot in common. Here are the most notable similarities.
Both are hip hinge movements
Both the rack pull and deadlift are hip hinge movements that involve flexion and extension at the hip joint. During these exercises, the hips move back and the torso is bent forward while the back/spine is kept straight.
Effective hip hinging is an essential component of functional movement when the goal is optimal performance and injury prevention.
The hip hinge is also an essential part of everyday movements such as bending down to picking up things off the floor. Not to mention, several exercises other than the rack pull and conventional deadlift involve the hip hinge such as kettlebell swings, squats, other deadlift variations, and more.
You should learn to effectively hip hinge before you even think about lifting heavy weights.
Both involve lifting “dead weight”
We already know that deadlifts involve lifting “dead weight” (not using momentum). But the rack pull is a dead lift as well. You’re just lifting the bar from a higher position.
It is possible to use a little momentum with heavy pulls, but this isn’t typically advised for safety or optimally engaging/training the muscles involved in the movement.
Both work the same muscles
The rack pull and deadlift work all of the same muscles, however, to a different extent. For example, the deadlift will work the lower body to a larger degree while the rack pull calls the back extensors and glutes into action to a great extent initially. The degree of hip hinge also plays a role in the extent of the muscles engaged during each movement.
The more the hips are hinged forward, the more the back extensors are involved.
Rack Pull vs. Deadlift Differences
While the rack pull and deadlift do share obvious similarities, they have a few differences.
Range of motion/movement
Rack pull
The rack pull is often referred to as a partial deadlift or block pull because it obviously involves a shorter range of motion when compared to a conventional deadlift. The height from which the bar is lifted does vary depending on how the lifter decides to perform the exercise.
Most lifters set the bar somewhere around knee height, although some set it well above or below the knees.
Deadlift
The conventional deadlift is performed using a “full” range of motion since the movement starts from the floor and ends in a standing position.
Lifting technique
The rack pull and deadlift involve essentially the same body mechanics when done in their most basic form, with the difference being the range of motion. Because as mentioned, they’re both hip hinge exercises that require you to pull dead weight from a rack or the floor. Not to mention, the rack pull is oftentimes performed with the bar set up much lower than the knees, making it even more similar to the deadlift in terms of the range of motion.
But because the range of motion is different between the two movements, they do require a different setup.
The deadlift requires a larger degree of knee flexion and extension compared to the rack pull. Therefore, during the deadlift, more lower-body force is required to extend the knee and get out of the bottom of the deadlift position. This means better overall activation of the quads and hamstrings when compared to the rack pull.
The deadlift is also a suitable replacement for squats which means it works all leg muscles to a similar degree. This is not the case with the rack pull.
Because the rack pull focuses more on the upper 3/4 to top half of the movement, the back extensors, hips, quads, and glutes are forced to engage to a larger degree, at least initially. And oftentimes, lifters can pull more weight on the rack pull when compared to the conventional deadlift due to the shorter range of motion.
Muscles Worked
While the rack pull and deadlift do work the same muscles, the extent to which each muscle is engaged differs between the two to a degree, although both are effective total-body movements.
Muscles worked during rack pull and deadlift:
- Legs (quads, hamstrings, calves, glutes)
- Hips
- Core muscles (abdominals, obliques, lower back)
- Back muscles (Traps, rhomboids, lats, erector spinae)
- Rear delts
- Biceps
- Forearms
Legs
The leg muscles should initiate the movement of the bar by helping you to drive it up off of the ground or chosen platform. The lower body is where the majority of your strength is going to come from during either lift.
Hips
The hips are important during all pulling movements from the hinge to the extension and lockout at the top of the exercise.
Core
Without a rigid, strong core, you can pretty much forget about pulling heavy poundages off the floor because it ain’t happenin…
The muscles of the trunk connect your lower and upper body are crucial for the stability and strength of any total-body movement or activity. But the deep core muscles or transverse abdominis are especially important for maintaining that rigidity because they act as a weightlifting belt which keeps the core contents tight and compressed.
The Valsalva technique is one method commonly used by heavy lifters and strength athletes to ensure the core is rigid. This method involves doing the following:
- Breathe in so your belly expands out.
- Hold your breath and brace your core in this position.
- Breathe in a little more.
- Perform the lift and then breathe out slowly only at the end of the concentric portion of the lift.
It’s often recommended to use this technique at your own risk but it is extremely effective for being able to move maximum weight off the floor.
Back
All muscles of the back play a large role in both the rack pull and deadlift. However, where a lot of people go very wrong is by rounding the back and pulling with the back to lift the weights. This is a recipe for serious pain and injury.
Again, the legs need to power the weight up and we explained that these are hip hinge movements, hence the need for the hips to be largely active to facilitate the mid and lockout portion of the exercise.
It’s common knowledge that you shouldn’t lift heavy weights with your back but you do need to stabilize your back muscles to be able to lift that weight effectively.
Rear delts
The rear delts are very important during heavy pulls because to safely and effectively lift heavy, you need a strong posture.
Biceps
Anytime you’re pulling against a load, the biceps are going to be heavily involved. Therefore, you are going to build stronger and larger biceps doing pulling movements. However, heavy lifts are also responsible for a lot of torn biceps (it happens to the best of them).
A bicep injury doesn’t mean the lifter doesn’t know what they’re doing but it can happen with too much weight. Although, some people tear a bicep using bad form and bending the elbows.
Forearms/grip
The same thing that we just explained regarding the biceps also applies to the forearms. Gripping and pulling requires the forearms. Not to mention, heavy pulls train the grip very effectively. This is just another reason why you should be doing them. A strong grip will improve all of your lifts and functional strength.
Exercise Instructions/How-To
If you’re going to do either or both of these movements, then it’s essential that you do them properly to prevent injury and get the most benefits out of them as you possibly can.
Here are step-by-step instructions for the rack pull and deadlift…
Rack pull
- Set up the bar just below the knees or at about mid-shin.
- Walk up close to the bar and position your feet comfortably about hip or wider, with toes pointed forward or slightly outward. The bar should be over midfoot, and about an inch from the shins when standing straight up.
- Grip the bar with your hands just outside of your legs and keep your body close to the bar. Upper legs should be higher than parallel to the floor.
- Position your shoulders slightly forward past the bar.
- Flex your lats, pull your chest up, retract your shoulder blades, and tighten your core muscles.
- Drive the weight up through your feet, move your knees back just enough to clear a path for the bar, and then push them forward as the bar passes.
- Squeeze the glutes at lockout for stability and to prevent hyperextension of the lower back.
- Hold the weight for a second or two and then lower the bar back to the pins or platform. Do not use momentum.
Deadlift
- With the loaded barbell on the floor, place your feet underneath so that your shins are about an inch from it, the bar is over midfoot.
- Find a comfortable stance and turn your toes slightly outward to allow for an easier bar path upward.
- Bend down and grip the bar so that your hands are just outside of your shins. Your upper legs should be just above parallel to the floor.
- Position your shoulders slightly forward past the bar.
- Flex your lats to stabilize the bar close to your body, pull your chest up, retract your shoulder blades, and tighten your core.
- Drive through your feet to lift the bar off the ground keeping it close to you.
- Move your knees back just enough to clear a path for the bar, and then push them forward as the bar passes.
- When the bar passes the knees, move your hips forward to lockout at the top and squeeze your glutes.
- Hold this position for a second or two and then lower the bar back to the floor before completing the next rep. Do not use momentum.
Benefits
There are obvious benefits to doing both the rack pull and deadlift.
Hypertrophy – Heavy pulls are arguably the greatest full-body exercise for building size. The reason being is because they allow you to lift more weight at once than essentially any other movement/exercise. Muscles need to be challenged and stressed beyond they’re used to in order to adapt and elicit a growth response to compensate for the new loads being placed upon it.
You can also elicit a hypertrophy response by increasing the reps beyond what you did previously. However, this method does have diminishing returns after a certain point.
Strength – The same thing above applies to the strength-building aspect of heavy pulls. Progressive overload is the only way to increase strength.
Power – Rack pulls and deadlifts are often used to improve lower-body power. Knee and hip extension proficiency is an essential component when it comes to effectively engaging in athletic activities/movements.
Grip – There are few activities that are more effective for building an iron grip that heavy pulls. We recommend not using lifting straps for pulls if you don’t need too. Although, they do come in handy in some instances like when the grip is a limiting factor.
Improves posture/lifting posture – The rack pull and deadlift require a strong upper posterior (backside of the body). By the same token, progressing in these movements and becoming proficient at them will strengthen the muscles that promote and maintain good posture.
Improving lower back pain – Research has shown that deadlifts can help with lower back pain. Although, they’re best prescribed conservatively and in those without chronic pain or sufficient back extensor strength. (1)
Rack pull vs. deadlift Pros and Cons
We’ve shared some of the pros and cons of the rack pull and deadlift below.
Rack pull pros
- Possibly less taxing on the body
- Great for improving the top half of the deadlift/lockout
- Very effective for overloading the back muscles, especially the traps
- You can generally lift heavier which is great for really overloading the target muscles
- You can more effectively take your sets to failure and beyond due to range of motion
- Good for those with less joint mobility
- Better option for those with back pain due to shorter range of motion
- Build amazing grip strength
Rack pull cons
- More likely to result in back pain/injuries due to improper form
- Many lifters use too much weight because they can (not always a good thing)
- Requires a setup where you need to elevate the bar (not everyone has access to this equipment)
Deadlift pros
- Arguably the best total-body movement in existence
- More applicable to real-life movements (e.g. athletic movements)
- Superior for beginners to learn full-body lifting
- Very efficient movement (works a large number of muscles)
- More options/variations
- Only requires weights (no racks or anything needed)
- Build amazing grip strength
Deadlift cons
- Likely more taxing on the body
- Not an exercise many lifters look forward to doing
- Can also result in injury with improper form
- Requires more overall mobility in the ankles and hips
Tips/Things To avoid
Here’s some information to ensure that you perform both movements as safely, and effectively as possible.
Rack pull tips
Weight – Choose a weight that you can handle. Yes, many people can lift more doing the rack pull than the deadlift. But that doesn’t necessarily mean you should, especially when your form is being compromised. The body has limits and you don’t want to place unnecessary stress on your body without gradually adapting to the workloads.
Too much weight can wreak havoc on the hips, back, and upper extremities, even causing thoracic outlet syndrome. This occurs when blood vessels or nerves between your collarbone and first rib are compressed, resulting in shoulder and neck pain, and numbness in the fingers.
You can lift heavy but you need to understand your limits and never neglect perfect form.
Range of motion – While the lifter will ultimately decide on how they want to perform the rack pull, we recommend setting the bar at or preferably just below the knees to closer mimic the deadlift. But you still get the benefits of possibly being able to train a little heavier while focusing more on the upper half of the pull.
The above-the-knee variation may be acceptable for some lifters who can do it safely, especially when it comes to overloading the traps. However, for many, there’s a temptation to load up too heavy and use poor form. This variation may be able to be used as an accessory but caution really needs to be taken here.
Many will also agree that the above-the-knee variation likely does not offer much carryover to the conventional deadlift which is something to keep in mind.
Setup – When setting up for the rack pull, there are a few crucial points to remember to ensure proper body position and bar path during the pull.
- Setting up with your shins an inch from the bar ensures the bar remains over midfoot.
- The feet need to be planted flat on the floor so that you’re not able to rock back or forward. This means the bar is not over midfoot.
- Do not drop the hips or lean back during the rack pull.
- The shoulders need to be slightly forward past the bar.
- The back should be flat and slightly above parallel to the floor, and hips hinged forward.
The movement – Do not lean back during the rack pull or the deadlift at the top. Stand straight up and pull the shoulders back. Also, never yank the bar off the ground. This is poor execution and can be very bad for the lower back. The same applies to the deadlift.
Deadlift
Weight – The same applies to the deadlift as it does the rack pull. If you can’t maintain good lifting posture and lift with proper body mechanics, the weight is too heavy. Ego lifting benefits no one.
Setup – The deadlift setup is similar to the rack pull, except the hips start from a lower position.
Who Should Do Rack Pulls and Deadlifts
Almost anyone can do rack pulls and deadlifts. However, if you have an injury/s or limited mobility, we recommend seeking advice from a medical professional/s first to ensure your safety. Although, the deadlift can be useful for either of these issues.
These movements are beneficial for powerlifters, weightlifters, bodybuilders, any athletes, and those who do general weight training. Not only do these movements build muscle and strength, but they can improve athletic performance through overloading and training knee and hip extension.
For powerlifters, the deadlift is non-negotiable because it’s a required movement in competition. Weightlifters do require the deadlift as part of the snatch and clean and jerk.
The rack pull and deadlift can be used for rehab purposes and to strengthen the body after developing injuries. It’s not uncommon for people with back pain to see improvements in pain, which has also been shown in studies to be the case.
How To Program The Rack Pull and Deadlift
We recommend doing either the rack pull or deadlift first in your workouts as they do require the most energy and muscle recruitment. As a result, you can maximize overload and consequently, make better gains.
While you could do deadlifts and rack pulls in one session, both movements can be very taxing on the body, especially for the average lifter. It can be done though. But it depends on several factors such as intensity, volume, goals, etc.
Now, we do think it’s better to learn the deadlift before utilizing the rack pull (if possible). But the latter can make for a great accessory movement while you’re building up your deadlift while using proper form. Also, the rack pull is an option for a progression to the deadlift.
So, you could start with the bar higher and then gradually drop it down until the weights are on the floor.
After you’ve become proficient in the deadlift, you can effectively alternate the deadlift and the rack pull, and program them into your train however you find fitting. For example, you could do 6 weeks deadlift focus and then 6 weeks rack pull focus, alternating this pattern. This can be modified of course.
As for sets and reps, well, that also depends on several factors such as your goals, physical condition, age, schedule, etc.
For example, powerlifters will often train in the 1-8 rep range because heavy loads are superior for building strength.
For anyone looking to increase strength and muscle mass, 6-12+ reps is an ideal range. This is also a good rep range for athletes.
For muscular endurance and recovery/lighter training days, 15+ reps can be effective.
But it’s also a good idea to use a variety of rep ranges as long as you pay attention to your recovery and not overdo it. Train hard but train smart.
The number of sets that you do will depend on how frequently and intensely you train. Although, 3-5 sets is typical. But with consistent training, you’ll be able to better learn what works best for you and can, therefore, determine an appropriate training volume.
Deadlift vs. Rack Pull Variations
There are a few variations of each exercise that you should be aware of. Because they are very useful and many people prefer to stick with certain variations as opposed to doing an exercise in its most basic form, how most would normally do it.
Deadlift variations
These are the most common deadlift variations.
- Sumo deadlift
- Jefferson deadlift
- Trap bar deadlift
- Deficit deadlift
- Suitcase deadlift
- Snatch grip deadlift
- Romanian deadlift
- With chains/bands
Rack Pull variations
These are the most common rack pull variations.
- Above, at, and below the knee rack pull
- Using blocks
- Smith machine (or similar) rack pull
- Snatch grip rack pull (below knees)
- Reverse band rack pull
- With chains/bands
Rack Pull vs. Deadlift: Is One a Better Option?
These are two different movements. Therefore, you won’t get the complete benefits of the deadlift by doing the rack pull and vice versa.
But it really depends on how you perform each exercise as there are several variations possible with the rack pull and deadlift. Hopefully, you can take from this information what you need and apply it to your training. There’s no reason why you can’t benefit from both exercises. But if one suits you better, that’s totally fine.
Wrapping Up
There doesn’t have to be a rack pull vs. deadlift debate because they can both be utilized effectively. However, if you do choose just one, make sure that it fits best with your goals. The deadlift is the best full-body movement there is but the rack pull definitely has its advantages.


