Old-school bodybuilders and weightlifters had it tough. Unlike today’s lifters, they had no plush gyms or access to fancy equipment. They didn’t even have benches or squat racks! But, rather than cry into their protein shakes about these deficiencies, they got busy being creative.
After all, where there is a will, there is usually a way!
For example, before the bench press became the world’s favorite chest exercise, old-time lifters did floor presses instead. No leg press? No problem; just lie on your back and balance a barbell on your feet!
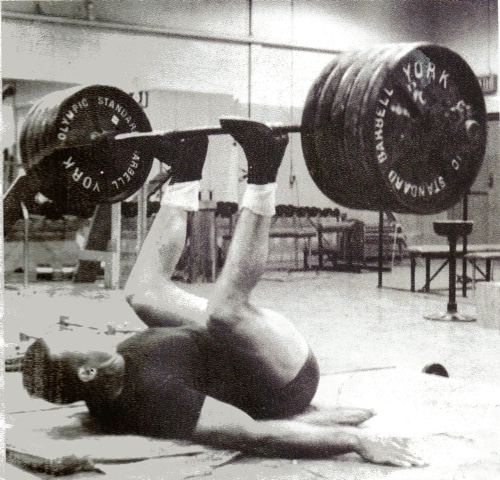
Squat and power racks were also yet to be invented, so old-school lifters did something called the Steinborn squat instead. Popularized by influential early 20th-century weightlifter and strongman Henry “Milo” Steinborn, this unique exercise allowed lifters to hoist heavy weights onto their shoulders for back squats.
Was this safe? Probably not, but it worked and allowed the lifters of the day to squat without starting their set with a power clean.
Now, we’re not saying you need to start adding Steinborn squats to your workouts. After all, squat and power racks exist for a reason. However, it’s often interesting to see how old school lifters trained, even if it’s only to make you appreciate your modern training facilities.
So, in this article, we reveal why and how to do the Steinborn squat and provide you with some exercises you can do instead.
Steinborn Squat – Muscles Worked
Squats are already a compound exercise, meaning they involve multiple muscles and joints working together. However, Steinborn squats go a step further and are essentially a full-body exercise.
The muscles worked most during Steinborn squats are:
Quadriceps
Located on the front of the thighs, the quadriceps are the four muscles responsible for extending your knees. The four quads muscles are the rectus femoris, vastus lateralis, vastus intermedius, and vastus medialis. Once you get the bar into position, you’ll probably feel Steinborn squats mostly in your quads.
Gluteus maximus
Known as the glutes for short, this is the muscle group on which you are currently sitting! The glutes are the largest muscle in the human body, and their main function is hip extension. The deeper you descend, the more active your glutes will be during Steinborn squats.
Hamstrings
The hamstrings are a group of three muscles – the semimembranosus, semitendinosus, and biceps femoris. Located on the back of your thighs, they flex your knees and, working with the glutes, extend your hips. However, while the hamstrings ARE involved in Steinborn squats, they’re not as active as the quadriceps or glutes.
Hip abductors
The abductor group of muscles is located on the outside of your hip and thigh. They are responsible for lifting your leg out and away from the midline of your body, which is a movement called abduction. During Steinborn squats, the abductors primarily work as stabilizers. The main abductors are gluteus minimus and medius, and tensor fascia latae.
Hip adductors
Located on the inside of your thighs, the three adductor muscles are the longus, brevis, and magnus. These muscles draw your leg into the midline of your body, which is a movement called adduction. The adductors mostly work as stabilizers during Steinborn squats. However, adopting a wider stance means these muscles are more active.
Core
All types of squats involve your core, but Steinborn squats take core activation to a whole new level! Core is the collective name for the muscles of your midsection, including your erector spinae, rectus abdominis, obliques, and transverse abdominis. Steinborn squats require and develop a strong core. For most people, core strength will be the limiting factor when performing Steinborn squats.
Upper body
While Steinborn squats are predominately a lower body exercise, you’ll also need to use your entire upper body to lift and support the load. Your delts, lats, pecs, biceps, and triceps are all going to get a workout from this unique old-school exercise.
How to Do Steinborn Squats
Steinborn squats are arguably one of the most challenging exercises you can do with a barbell. You’ll need excellent mobility, balance, and strength to pull this exercise off safely. So, don’t go too heavy too soon. In fact, most lifters should start with an empty barbell when first doing this exercise.
Get more from Steinborn squats while keeping your risk of injury to a minimum by following these guidelines:
- Brace your core and keep it braced throughout.
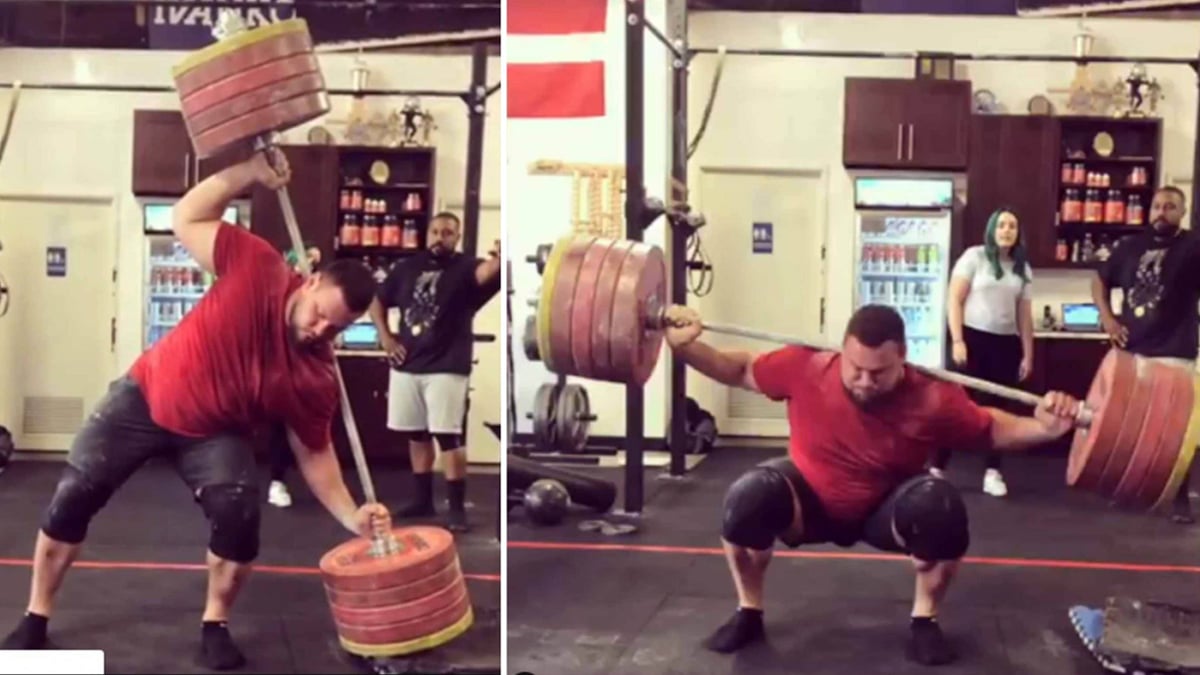
- Place your barbell on the floor and stand at one end. Squat down, grab the end, and lift it to shoulder level.
- Push the bar upright until it’s vertical.
- Standing sideways onto the bar, lean to the side and grip the barbell with your hands about shoulder-width apart. Use the knurled rings for reference. Your feet should be roughly shoulder-width apart.
- Duck under the bar and press your traps against the middle of the bar. Grip it tightly and pull it down onto your back to ensure that it won’t move.
- Next, bend your knees, descend into a deep squat, and rock the bar onto your upper back.
- Drive your feet into the floor and stand up. Repeat the squat for the desired number of reps.
- Return the barbell to the floor by squatting down, leaning to the side, and putting the end of your bar on the deck. Push it upright, grab the end of the bar, and lower it back to the floor.
Tips:
- Alternate sides set by set to ensure you develop both sides of your body equally.
- Do this exercise with a spotter – especially for the first few times.
- Increase the weight gradually. The difficulty of the movement means that even a small can feel very heavy and awkward.
- You can walk the bar into a squat rack at the end of your set if you don’t want to do the lowering part of the exercise.
- Use plenty of lifting chalk to prevent your hands from slipping. Also, put chalk in the middle of the bar, so it’s less likely to move unexpectedly.
Steinborn Squats Benefits
Not sure if Steinborn squats are the right exercise for you? Consider these benefits and then decide!
No squat rack required
While most gyms have squat and power racks, such devices may be too big or too expensive for some home lifters. Steinborn squats give you a way to get a barbell on your back so you can do back squats.
Build an iron-clad core
Steinborn squats start with a heavily weighted side bend. Side bends work your entire core, especially the obliques. You’ll also need to keep your core braced throughout your set to stabilize the load. In short, Steinborn squats are a very effective core exercise.
A unique challenge
Modern strength training is pretty safe, and most lifters are happy about that. However, if you enjoy pushing the envelope and trying new things, you’ll probably enjoy doing Steinborn squats. Even light loads are challenging, and you’ll need to practice to learn and master this exercise.
So, looking to stand out on YouTube, TikTok, or Instagram? Video yourself doing Steinborn squats!
An excellent challenge for potential strongman competitors
So, you want to be a strongman like Eddie Hall, Brian Shaw, or Tom Stoltman? Then maybe it’s time to try the Steinborn squat. This old-time test of strength might not be a standard competitive lift, but it trains all the muscles you need to develop to be a successful strongman.
Here’s Martins Licis doing an incredible World Record 254kg/560lbs Steinborn squat – just for fun!
Drawbacks
While Steinborn squats are a legitimate exercise, they aren’t for everyone. Consider these drawbacks before giving them a try:
High risk of injury
There is a reason that squat and power racks were invented; they make squatting much safer and negate the need to do Steinborn squats in the first place. While Steinborn squats are an accepted old-school exercise, they can be hazardous, especially when performed with heavy weights. Back, knee, and shoulder injuries are potential risks during this exercise.
Less overload for the legs
The hardest part of the Steinborn squat is getting the bar on your back. The chances are you can squat more weight but won’t be able to get it onto your back using the Steinborn method. As such, you may find that Steinborn squats present more of a technical and less of a strength or muscle-building challenge.
A lot to go wrong
Steinborn squats are technically demanding, and there is a lot to go wrong. You need to position your hands evenly, get the bar into the right place on your back, and make sure you’re in the middle of the bar, so the weight is even. And that’s BEFORE you drop into a squat and pick up the barbell!
Performed correctly, the Steinborn squat looks super-cool. Still, if you get it wrong, you can expect to get into all kinds of trouble, potentially dropping the bar, or even getting hurt. This is NOT an exercise to try in a crowded gym!
7 Steinborn Variations and Alternatives
Steinborn squats are a divisive exercise. On the one hand, they’re a part of bodybuilding history, but on the other, there are safer ways to train your legs. So, by all means, give Steinborn squats a try, but also consider using these similarly effective and considerably safer alternatives instead.
1. Power clean to front squat
The Steinborn method is not the only way to get a barbell onto your shoulders for squats. A power clean works just as well and is easier to learn. However, you’ll probably need to do front squats instead of back squats when training with heavy weights.
Steps:
- Place your barbell on the floor. Stand behind it with your toes under the bar, feet around shoulder to hip-width apart.
- Squat down and grab the bar with an overhand shoulder-width grip. Straighten your arms, drop your hips, lift your chest, brace your core, and pull your shoulders back and down.
- Drive your feet into the floor and stand up explosively.
- As the bar passes your knees, use your arms to pull it up the front of your body.
- As it nears your chest, bend your knees slightly and push your elbows forward to catch the bar across the front of your shoulders.
- Your upper arms should be parallel to the floor.
- Bend your knees and squat down until your thighs are at least parallel to the floor.
- Stand back up and repeat.
- Lower the bar down the front of your body and back to the floor at the end of your set.
Muscles targeted:
- Primary: Quadriceps, hamstrings, gluteus maximus, abductors, adductors, core.
- Secondary: Biceps, trapezius, deltoids.
Benefits:
- Safer and easier to learn than Steinborn squats.
- A true full-body exercise.
- A widely recognized and accepted strength training exercise.
Tips:
- You can also do this exercise with dumbbells.
- Start your power clean from the hang position to save having to lift the bar from the floor.
- Experiment with your stance width to find the best placement for your feet.
2. Zercher squat
Like the Steinborn squat, Zercher squats came about because of a lack of squat racks. However, this exercise was invented by powerlifter Ed Zercher and is still a popular modern-day training method.
Steps:
- Hold a barbell in the crook of your elbows and stand with your feet shoulder to hip-width apart, toes turned slightly outward. Brace your core and pull your shoulders back and down.
- Push your hips back, bend your legs, and squat down until your thighs are roughly parallel to the floor. Descend deeper if your mobility allows. However, do not round your lower back.
- Stand back up and repeat.
Muscles targeted:
- Primary: Quadriceps, hamstrings, glutes, core.
- Secondary: Biceps, trapezius, deltoids.
Benefits:
- No squat rack required.
- You can safely drop the weight if you cannot complete a rep.
- An effective lower AND upper body exercise.
Tips:
- Heavy weights can be uncomfortable for your arms. Use a squat bar pad or wrap the bar in a towel to make it less painful.
- Raise your heels on blocks or weight plates to keep your torso more upright and emphasize your quads.
- Wear a weightlifting belt for safety and support.
3. Single-arm kettlebell front squat
While Steinborn squats work your legs and core, just getting the barbell on your back is a real challenge. The single-arm kettlebell front squat trains all the same muscles but is much less complicated to perform and more accessible for most lifters.
Steps:
- Rack and hold a kettlebell on one shoulder. Brace your core and pull your shoulders back and down.
- Stand with your feet between shoulder and hip-width apart.
- Keeping your torso straight and upright, bend your legs and squat down until your thighs are at least parallel to the floor. Take care not to round your lower back.
- Stand back up and repeat.
- Rest a moment and then swap sides.
Muscles targeted:
- Primary: Quadriceps, glutes, hamstrings, core.
- Secondary: Deltoids.
Benefits:
- As effective as Steinborn squats but much easier to learn.
- Only one weight is required.
- Ideal for home lifters and exercisers who train without spotters.
Tips:
- Use your non-working hand to help you get the kettlebell into position if necessary.
- Raise your heels on blocks or weight plates to make this exercise more quads-dominant.
- You can also do this exercise with your arm extended above your head, like this:
4. Barbell suitcase deadlift
The barbell suitcase deadlift might not look much like the Steinborn squat, but it actually uses many of the same muscles. However, as an added benefit, the suitcase deadlift is also excellent for developing a stronger grip.
Steps:
- Stand sideways onto a loaded barbell. Your feet should be roughly hip-width apart.
- Brace your core, and square your shoulders and hips.
- Squat down and grab the center of the barbell with your palm facing your leg.
- Drop your hips, lift your chest, and slightly arch your lower back.
- Drive your feet into the floor and stand up. Do not lean sideways.
- Lower the bar back to the floor and repeat.
- Do the same number of reps on both sides.
Muscles targeted:
- Primary: Quadriceps, hamstrings, glutes, core, forearms.
- Secondary: Trapezius, biceps.
Benefits:
- A very functional leg and core exercise.
- Good for building a cast-iron grip.
- A very safe exercise – just drop the bar if you cannot complete a rep.
Tips:
- You can also do this exercise with a single kettlebell or dumbbell.
- Use chalk to prevent your hands from slipping.
- Use fat grips or a thick bar to make this exercise more grip-centric.
5. Single-arm farmer’s walk
While single-arm farmer’s walks don’t look anything like the Steinborn squat, they work many of the same muscles. However, they don’t work your legs as hard. That said, if you want a stronger core but aren’t athletic enough to do Steinborn squats, the single-arm farmer’s walk is an excellent choice.
Steps:
- Pick up a heavy dumbbell and hold it in one hand, arm by your side, and palm facing your leg.
- Pull your working shoulder back and down, and brace your core.
- Walk around your training area until you feel your grip is about to fail.
- Lower the weight to the floor, switch hands and repeat.
Muscles targeted:
- Primary: Core, trapezius, forearms.
- Secondary: Lower body.
Benefits:
- Easy to learn
- A very safe exercise.
- A very functional core and forearm workout.
Tips:
- You can also do this exercise with a heavy kettlebell.
- Use a thick handle to increase forearm engagement.
- Raise your weight above your head to make this exercise more challenging, i.e., a single-arm waiter’s walk, like this:
6. Kettlebell windmill
A well-performed Steinborn squat requires bending to the side while holding a heavy weight. This is something that may be best learned without the complication of doing a squat at the same time. The kettlebell windmill will help develop the mobility and core strength needed for Steinborn squats.
Steps:
- Hold your kettlebell in your left hand above your head, arm straight. Brace your core.
- Position your feet, so they’re slightly wider than shoulder-width apart, toes turned out to around 45 degrees.
- Keeping your arm vertical, hinge at the hips, and lean down toward your left foot with your right hand. Shift your hips to the right as you descend.
- Touch your foot, then return to the starting position, all the while keeping your kettlebell over your head.
- Repeat for the desired number of reps, and then switch hands.
Muscles targeted:
- Primary: Core, deltoids, triceps.
- Secondary: Hip abductors.
Benefits:
- A good training exercise for Steinborn squats.
- An effective way to develop spinal mobility and stability.
- A highly functional core exercise.
Tips:
- Adjust your range of motion according to your mobility; you don’t have to touch your foot and can stop at your knee if you wish.
- Keep your eyes on your kettlebell as you lean sideways.
- Hinge from the hips, and do not bend the knees during the movement.
7. Kettlebell Turkish get-up
The Steinborn squat is a pretty convoluted exercise. However, the combination of side bends and squats means you can train your legs and core simultaneously. Turkish get-ups are similar in that they also train your legs and core. That said, the movement is very different!
Steps:
- Lay on the floor with your legs straight and your right arm extended with the kettlebell in the racked position.
- Bend your right leg, keeping your left leg extended out on the floor in front of you. Your left arm should be slightly extended beside you for support.
- Pushing through your right heel, roll onto your left hip. Keep your arm straight.
- Push your hips up through your right leg, and then slide your left leg behind you. This will bring you to a half-kneeling position.
- Lunge forward into a standing position.
- Reverse the processes to return to your starting position.
- Repeat for the desired number of repetitions and then switch sides.
- Do the same number of reps with both arms.
Muscles targeted:
- Primary: Core, quadriceps, hamstrings, glutes.
- Secondary: Triceps, deltoids.
Benefits:
- A great way to develop your core, legs, and shoulders at the same time.
- A good test of mobility, stability, and flexibility.
- An excellent functional exercise for athletes.
Tips:
- Start with a light kettlebell – this exercise is harder than it looks.
- Keep your eyes on your kettlebell throughout this exercise.
- Make this get-ups even harder by using a barbell instead of a kettlebell, like this:
Steinborn Squat FAQs
Do you have a question about Steinborn squats or old-time strength training? No worries because we’ve got the answers!
1. Who should do Steinborn squats?
Steinborn squats are an old-school exercise invented by Henry “Milo” Steinborn because he didn’t have access to a power rack but still wanted to do back squats. So, they were borne out of necessity rather than because he wanted to achieve a specific training goal.
So, if you’ve got a squat or power rack, you probably don’t need to attempt Steinborn squats.
That said, if you want to improve your leg and core strength and hip and spine mobility, Steinborn squats will undoubtedly help.
Steinborn squats probably won’t be much use to bodybuilders. Still, they could be helpful for strongman competitors, CrossFitters, athletes, and anyone looking to test and develop their functional strength.
2. Are Steinborn squats safe?
There is a risk when doing any exercise, and accidents sometimes happen even when you’re being careful. However, the asymmetrical loading and unusual movement mean that Steinborn squats are one of the riskier things you can do with a barbell.
If you think the risk outweighs the benefit, you should probably skip Steinborn squats and do one of the seven alternatives listed elsewhere in this article. After all, you can’t train if you are injured, so it’s best to avoid risky exercises whenever possible.
3. What exercises will help prepare me for Steinborn squats?
Steinborn squats are an advanced exercise and should not be attempted by beginners. That said, there are a few exercises you can do that will help prepare your body for the demands of Steinborn squats so that, when you do try them, you are physically ready.
These exercises are:
- Regular back and front squats
- Kettlebell windmills
- Kettlebell Turkish get-ups
- Single-arm front squats
Master these moves before attempting the Steinborn squat.
4. How many reps should I do of Steinborn squats?
Steinborn squats are a very technical exercise, so you should focus on movement quality rather than quantity. High-rep sets are not the way to go, as your form will probably deteriorate, increasing your risk of injury.
So, mostly do sets of 3-5 reps per set, stopping when you feel your form beginning to break down. 2-4 sets per side should be more than enough training volume.
5. Old-school lifters were seriously hardcore
That’s not really a question, but it’s undoubtedly true! Modern lifters have access to incredible facilities and state-of-the-art training equipment. Many of the tools we take for granted are designed specifically to make our workouts safer, comfortable, and more effective.
Old-time lifters had none of these advantages and made do with the most rudimentary training equipment. Many of them built great physiques with nothing but fixed-weight dumbbells and barbells, and most exercises were performed while standing.
Modern lifters are typically stronger and more muscular. Still, when it comes to being hardcore, the old school is the clear winner!
6. Why didn’t old-time lifters have big chests?
While old-time lifters were strong and muscular, most had relatively flat chests, especially compared to today’s bodybuilders.
There are a couple of reasons for this.
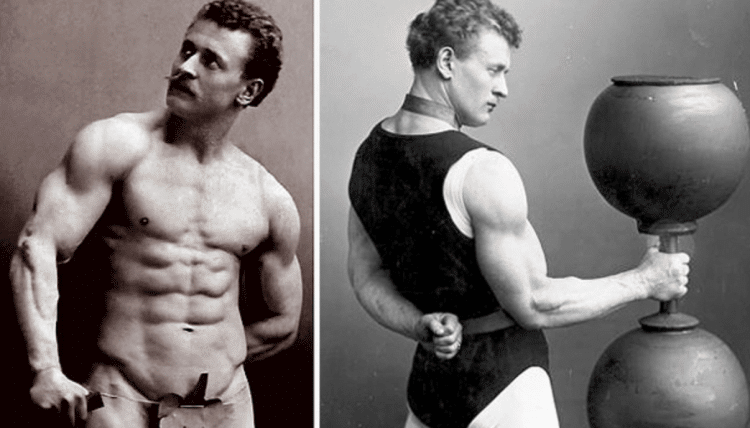
Firstly, the leading bodybuilders of the day, such as Eugene Sandow, Milo Steinborn, George Hackenschmidt, and Arthur Saxon, modeled their physiques on ancient Greek and Italian statues, most of which had small chests. This was the style of the time, much like extreme muscle mass is popular today.
Also, old-time lifters did not do bench presses, as they’d yet to be invented. Instead, they focused mainly on overhead pressing. Overhead presses are great for building bigger shoulders but have no real impact on chest size. Some will have done dips and push-ups for their chests, but this was definitely not a training priority.
So, as a result, most so-called bronze-era bodybuilders had very little chest development. However, their shoulders, arms, backs, and legs were often very muscular.
Steinborn Squats – Wrapping Up
Steinborn squats are one of those exercises that many lifters have heard of but never tried. They look spectacular when performed correctly, but with so much to go wrong, the risks can often outweigh the benefits.
Suppose you are a bodybuilder or just want to develop strong, athletic legs. In that case, the Steinborn squat probably doesn’t deserve a place in your workouts, and there are safer, more effective ways to reach your training goals.
However, if you are a strongman, CrossFitter, or advanced functional exerciser, the Steinborn squat could be just the challenge you’ve been looking for.
One thing is for sure – the Steinborn squat is a piece of bodybuilding history and an impressive feat of strength and mobility.
Interested in measuring your progress? Check out our strength standards for Bench Press, Push Ups, Zercher Squat, and more.


