The Jefferson squat is an incredibly effective exercise to target the quads, glutes, hamstring, and adductors. This exercise’s setup helps you train your muscles in multiple planes of movement, making it stand apart from the other squat variations.
The namesake of the circus strongman Charles Jefferson (1863-1911), this exercise can help you build strength and muscle mass while improving your overall functionality and mobility. Like with other exercises, the results of the Jefferson squat will depend on your form, execution, and mind-muscle connection.
The Jefferson squat is an excellent exercise to improve your hand-eye coordination. This movement involves your entire body as you must keep the bar stable throughout the range of motion and ensure it is straight and not leaning to one side or traveling at an angle.
The Jefferson squat is part lunge, part deadlift, and part squat, which works your muscles from a unique angle. This is an underutilized exercise, and performing it at your local gym might get you a few weird stares, but rest assured, the gains will be worth it.
In this article, we go over everything you need to know about the Jefferson Squat, including the correct form, muscles worked, benefits, common mistakes, frequently asked questions, and the variations and alternatives.
What is a Jefferson Squat?

The Jefferson squat is the mirror opposite of the conventional barbell squat. In the former, the bar is placed on the floor, and your knees are bent at the starting position. On the flip side, the bar never touches the floor in a conventional squat, and your knees are extended in the starting position.
The Jefferson squat involves straddling a barbell in a staggered stance and lifting the bar between your legs. You must move straight up and down while keeping your torso straight. The movement mechanics of this exercise limits lower back engagement, making it great for most lifters.
Irrespective of how much you squat or deadlift, you must always start small on the Jefferson squat if you have never tried this exercise. Getting used to the movement pattern might take some time before you can begin hitting ginormous PBs (personal bests) on the Jefferson squat.
Jefferson squat is an advanced exercise that comes with a steep learning curve and is best left to advanced lifters. Mastering the Jefferson squat can take multiple training sessions, and you shouldn’t try to rush the process, as it can increase your risk of injury.
Most advanced lifters use the Jefferson squat as an accessory lift to build a bigger squat and deadlift. It shouldn’t be your first choice to build lower body muscle and strength. However, as you get better at the Jefferson squat, you’ll have a better mind-muscle connection while performing this movement. The mobility, functionality, and stability you develop on the Jefferson squat will carry over to other compound movements.
How To Do a Jefferson Squat
This is the step-by-step guide to performing the Jefferson squat:
Step 1 — Take Your Position Over the Barbell
Place a barbell on the floor. Stand over the barbell with a split stance. Your front foot should be facing straight ahead, and the rear foot should be at 90 degrees relative to the front foot. The barbell should be parallel to your rear foot.
Lower yourself into a squat. At the bottom of the range of motion, your knees should be directly above your heels, and your feet should be grounded. Reposition your feet if this is not the case.
Pro Tip: Use the center knurling on the barbell as a guide to position yourself. The heel of your front and rear foot should be equidistant from the barbell. Perform a couple of squats without the weight to ensure you are in the correct position. Readjusting with a barbell in your hand will be more challenging.
Step 2 — Squat and Grab the Bar
While keeping your chest up, lower into a squat and grab the bar using a mixed grip at an equal distance from your body. You could also consider it a neutral grip since both your hands will be facing your body. The hand on the side of the front leg should be in front of you. Ensure that your knees don’t cave in during the descent.
Pro Tip: You can grab the bar with a full grip using your front hand. However, since your rear arm will have to travel longer, you will not be able to hold the bar with a full grip. This is one of the reasons you shouldn’t try to go too heavy on this exercise. Use the fingers of your rear hand as hooks.
Step 3 — Lift
Drive your feet into the ground and extend your knees and hips to stand up. The bar should travel straight between your legs. Focus on pushing your knees out during concentrics. Since you will be standing with a wide stance, don’t expect to lock out your knees at the top of the range of motion unless you want the bar to crash into your lower abdomen. Stop when the bar is a few inches from your groin.
Pro Tip: Depending on your anatomy and body mechanics, your torso might lean forward during the eccentric phase. However, you must ensure that you don’t turn this into a hip-hinge movement. Focus on engaging your quads, glutes, and hamstrings to lift the weight.
Step 4 — Finishing Strong
Lower the bar until your quads are at least parallel to the floor. The more depth you can achieve, the greater your lower body muscle fiber recruitment. During the warm-up reps, ensure you can achieve at least parallel while keeping your knees over your heels.
Complete the desired reps. For the next set, switch sides. This will ensure balanced strength and muscle growth. You don’t want to be the lifter who can perform the Jefferson squat with perfect form on one side but struggles to balance the bar on the other.
Pro Tip: Shorters folks might end up touching the bar to the floor at the bottom of the range of motion. In this case, you must allow the bar to settle before you begin your next set. Alternatively, you could try a wider grip.
Jefferson Squat Tips:
- Beginners should place an empty barbell on an elevated surface, such as yoga blocks, aerobic steps, or bumper plates, while learning to grab the bar correctly. Squatting all the way to the floor might not be viable for folks with limited mobility.
- Warm up your entire body before performing this exercise to ensure optimal range of motion.
- Beginners can practice this exercise on a Smith machine to prevent the barbell from moving at an angle.
- Feel free to hinge forward a little on concentrics to extend your range of motion and works your lower body through a bigger range of motion. However, you shouldn’t feel excessive lower back strain while doing this.
- Focus on your breathing while performing the Jefferson squat. Take a deep breath at the top. Hold it during eccentrics, and breathe out sharply during concentrics.
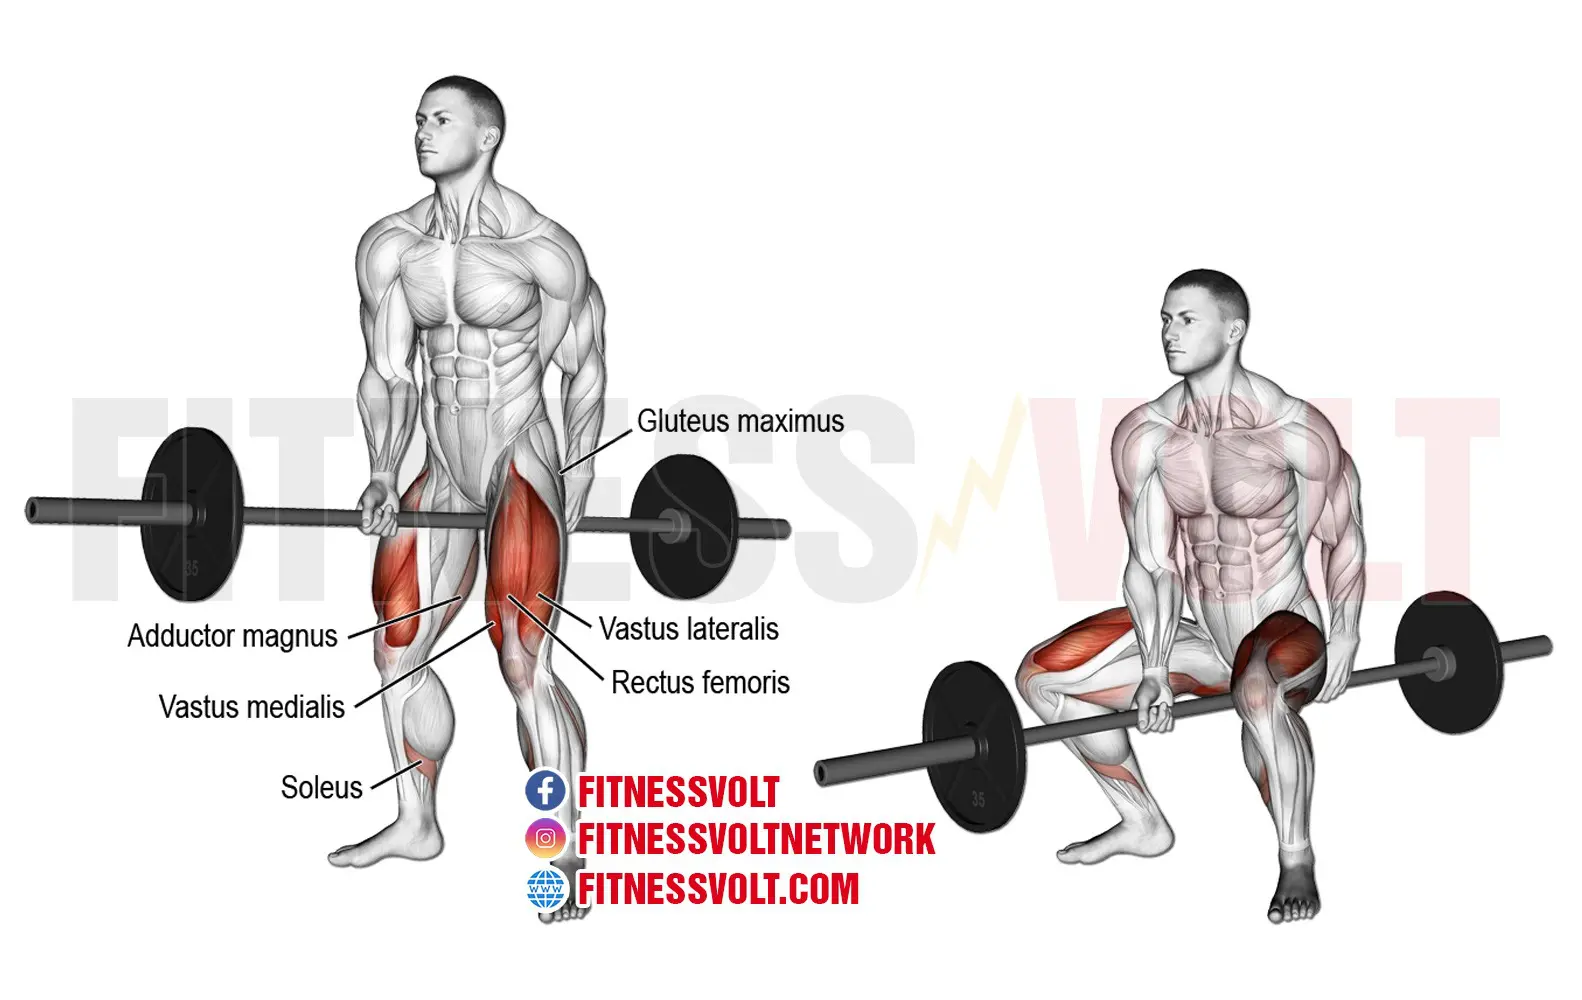
Muscles Worked During Jefferson Squat
The Jefferson squat is a compound exercise that works the following muscles:
Quadriceps, Glutes, and Hamstrings
The Jefferson squat primarily targets the quadriceps, glutes, and hamstrings. Quads are responsible for extending the knees during concentrics; the glutes and hamstrings do the same for the hips.
Feeling a greater muscle engagement in the front leg while performing this exercise is normal. Don’t change your position in hopes of greater back-leg stimulation. This is also why you should switch legs between sets while performing this exercise to ensure balanced development.
Adductors
The Jefferson squat recruits the inside on your thighs, helping build bigger and stronger adductors. Some lifters with poor hip mobility might experience abductor cramps while learning to perform this exercise. This exercise is excellent for testing and fixing your lower body mobility.
Adductor strength and mobility are a must for folks who want to build a big squat. The inside of your thighs is used in every exercise that involves a wide stance, such as a sumo squat or deadlift.
Obliques and Abs
The Jefferson squat requires you to maintain your torso at an angle, which puts significant demand on your abs and obliques. This exercise will help build a robust core and build strong core stabilizers. Keep your core braced throughout the exercise to resist the rotational pull of the barbell. You will experience greater tension in the obliques on the side of the front leg. Also, avoid leaning to one side while performing this exercise.
Benefits of Jefferson Squat
Here are the advantages of adding the Jefferson squat to your exercise regimen:
Builds Strength and Muscle Mass
Like every other strength training exercise, the Jefferson squat can help build muscle tissue and strength. Folks prioritizing muscle gains should perform three to five sets of eight to 12 repetitions per set with 60 to 80 percent of their one-rep max (1RM). (1)
Conversely, lifters biasing strength gains should do three to six sets of one to five repetitions per set with 80 to 100 percent of their 1RM. However, you must ensure you have mastered the exercise technique before chasing big weights.
Works Multiple Planes of Movement
The Jefferson squat is one of the few bilateral barbell exercises that allow you to train in all three planes of motion — sagittal, frontal, and transverse. Since the squat is a sagittal plane exercise, it is your body’s main movement plane. However, the barbell’s position in relation to your body involves the frontal and transverse planes.
This unique movement pattern can translate to better overall functioning and improve your performance in sports that require explosive lower-body strength, such as football, soccer, and basketball.
Improves Mobility
This exercise requires decent mobility to perform with the correct form and follow a full range of motion. That said, folks with poor mobility should look at the Jefferson squat as an opportunity to work on their weakness.
During this exercise, you should feel a deep stretch in your quads, glutes, adductors, and abductors. Hold the isometric contraction at the bottom to accentuate the stretch in the target muscles and ensure optimal muscle fiber recruitment.
Anti-Rotational
The Jefferson squat requires you to unlearn many things you mastered while learning the conventional barbell squat and deadlift. While performing this exercise, you must stand with one leg on each side of a barbell and hold your torso at a slight angle. This setup puts a significant demand on your midsection, helping improve your anti-rotational strength.
Building anti-rotational strength can improve your posture, balance, and coordination, boost your athletic and functional performance, and reduce the risk of injury by enhancing your core strength and stability.
Core Strength
Your core muscles, especially the obliques, will work extra hard to keep your torso in position during this exercise. It will help develop your core stabilizers, the benefits of which will carry over to and improve your performance in other compound exercises.
Keep your core braced throughout the range of motion for better stability. A loose core can lead to the turning of the torso during the exercise because of the rotation pull of the barbell, which can throw you off balance.
Trains Your Adductors
Training your adductors using free weights is extremely difficult. It is one of the reasons the adductor machine is so popular amongst gymgoers. The Jefferson squat is one of the best exercises to train your adductors using a barbell. Remember, you will feel better adductor engagement in your front leg while performing this exercise.
Training your adductors can significantly improve your conventional squat and performance in sports that require quick direction changes, such as football and basketball.
Common Mistakes While Performing Jefferson Squat
Avoid committing the following errors to reduce the risk of injury while performing this exercise:
Facing Forward
Most barbell exercises require keeping your shoulders and chest square; however, the Jefferson squat is not one of these exercises. Your torso should be at an angle while performing this exercise, meaning you will not look straight ahead.
Keeping your shoulder square will limit your range of motion and force you into hinging at your hips, which will bias your posterior chain. That said, you shouldn’t be facing to your side, either. Maintain your torso at 45 degrees relative to the bar.
Bending at Your Hips
This is a Jefferson squat rookie mistake. You must focus on keeping your torso upright while doing this exercise, and the movement should be limited to your knees and hips. However, a little forward lean during eccentrics is acceptable. Driving your knees out during the downward movement will make moving your hips straight up and down during the exercise easier.
Back Foot Heel Comes off the Floor
If your heels are coming off the floor during eccentrics, this is a sign that your stance is too narrow. It is your body’s way of compensating for the extended range of motion. Some people tackle this issue by limiting their range of motion and reversing the motion before their thighs are parallel to the floor.
Perform a few demo reps before grabbing the barbell to ensure you are in the correct position and weed out all the form issues.
Excessive Rounding of the Back
Many lifters want to touch the bar to the floor at the bottom of the movement and tend to round their backs to make it happen. However, this removes the tension from the quads and puts it on the lower back.
Keep your shoulders pulled back and down during this exercise to keep the focus on your quads, glutes, and hamstrings. Also, you don’t need to go all the way down on this exercise. Achieving parallel is enough for optimal target muscle stimulation.
Variations of Jefferson Squat
Here are the best Jefferson squat variations to add to your exercise arsenal:
Jefferson Rack Pull
This variation is a godsend for people who want to try lifting heavy on the Jefferson squat. You will need a squat rack with safety pins for this exercise. You could also do this exercise by stacking weight plates or aerobic steps, but the bar is more likely to roll out at the bottom in this setup.
How To:
- Adjust the safety pins in a power rack so the bar is at your knee level.
- Add an appropriate weight to the bar.
- Assume the Jefferson squat position and grab the bar with a mixed grip.
- Keeping your torso upright, pull the bar between your legs and lock out your knees.
- Slowly lower the bar to the starting position.
- Repeat for recommended reps.
Pro Tip: This exercise is excellent for beginners or folks with limited mobility. Strongman can benefit greatly from the Jefferson rack pull as it can improve their performance in events like the Dinnie stones.
Dumbbell Jefferson Squat
This is the most beginner-friendly Jefferson squat variation. It can help you drill the movement while using additional resistance. The dumbbells are easier on your wrists and adapt to your unique body mechanics. You could also do this exercise with kettlebells.
How To:
- Get into a Jefferson squat staggered stance.
- Hold one dumbbell in front of your body between your legs and the other behind your body.
- Keeping your torso upright, lower into a deep squat.
- Return to the starting position and contract your quads.
- Drive your arms into your body to keep the weights stable.
Pro Tip: Since you can follow an extended range of motion in this variation, it can result in greater lower body stimulation. However, since you’re using dumbbells, you won’t get the same core stabilizer engagement on this exercise as the conventional barbell variation.
Jefferson Deadlift
The Jefferson deadlift is a hip-hinge exercise. While you focus on going straight up and down on the Jefferson squat, you will bend your torso forward in this variation to bring the bar to the floor. The Jefferson deadlift biases your posterior chain.
How To:
- Stand with one leg on either side of a barbell and assume a Jefferson squat position.
- The Jefferson squat setup involves maintaining your torso at an angle. However, in this exercise, your shoulders will be square.
- Squat and bend forward to grab the bar.
- Drive your feet into the floor while extending your hips until your torso is 90 degrees.
- Lock out your knees and hips at the top of the motion.
- Repeat for recommended reps.
Pro Tip: Holding the barbell with a double overhand grip in this exercise can help you keep your shoulder square and allow you to focus on the hip-hinge movement.
Check out our complete Jefferson deadlift guide here!
Alternatives for Jefferson Squat
Use the following Jefferson squat alternatives to add variety to your training regimen and keep your workouts from going stale:
Zercher Squat
This is an advanced squat variation. It involves holding a barbell in your elbow pits while you do the squats. Since you must maintain an upright torso while performing this exercise and hold the barbell in front of your body, it removes the tension from your lower back and can help build a stronger upper back.
How To:
- Place a barbell at your waist level in a squat rack.
- Stand with your waist placed against the bar.
- Extend your arms so your lower arms are parallel to the floor and your upper arms are at 90 degrees.
- Place the bar in your elbow pits.
- Lift your lower arms toward the ceiling and hold your hands together. This will make the movement stable.
- Walk back and assume a shoulder-wide stance.
- Lower into a squat while keeping your torso upright.
- Explode back to the starting position.
- Repeat for recommended reps.
Pro Tip: Many trainers recommend people dealing with lower back pain and injuries switch to the Zercher squat. However, this exercise is not meant to treat injuries or fix lower back pain. You should consult your healthcare provider before starting a training program and get their approval on your exercises.
Check out our complete Zercher squat guide here!
Belt Squat
The belt squat is an incredibly effective lower-body exercise that doesn’t compress your spine. This exercise requires specialized training equipment. However, the growing popularity of this movement has led to the introduction of power rack belt squat attachments, making them accessible for home gym owners. However, we will stick to the machine squat for the sake of this article.
How To:
- Stand upright with a slightly wider-than-shoulder-width stance on the belt squat machine.
- Wear the belt around your lower back and hips. In this position, you will be in a partial squat, and the weights will be racked.
- Grab the handles and extend your knees. This will engage the weights.
- Slowly lower into a squat until your thighs are at least parallel to the floor.
- Return to the starting position.
- Repeat for recommended reps.
Pro Tip: Maintain an upright torso while performing this exercise. Leaning forward too much defeats the purpose of the belt squat. Also, avoid taking too wide a stance on this exercise. Achieving depth with a wide stance can put undue stress on your groin.
Check out our complete belt squat guide here!
Pendulum Squat
The unique movement trajectory of the pendulum squat alleviates the stress from your lower back and allows you to focus on your quads, glutes, and hamstrings. Getting used to this exercise can take some time, and you must initially use lighter weights on this squat variation to drill the movement.
How To:
- Place your back flat against the back pad and your shoulders under the shoulder pads.
- Position your feet shoulder-width apart on the foot platform and hold onto the handles on the shoulder rails.
- Disengage the safety pins by extending your knees.
- Slowly lower into a deep squat. Pause at the bottom before exploding back to the starting position.
- Rinse and repeat.
Pro Tip: Prioritize achieving a full range of motion on this exercise to achieve optimal lower body muscle fiber engagement. According to the Scandinavian Journal of Medicine & Science in Sports, “Full ROM training produced significantly greater adaptations than partial ROM on muscle strength and lower-limb hypertrophy.” (2)
FAQs
Who should do the Jefferson squat?
The Jefferson squat can be used by people across strength sports, including bodybuilders, powerlifters, strongman, weightlifting, and CrossFit. However, the unique movement dynamics of the exercise make it a perfect fit for strongman athletes, as the sport involves lifting and carrying awkwardly shaped implements. The Dinnie stones are one of the events that can be practiced with the Jefferson squat.
Is the Jefferson squat more effective than the barbell back squat?
The barbell back squat is known as ‘the king of lower body exercises’ for a reason. It is the most versatile exercise to build lower body strength and can be tweaked to fit different training needs and body mechanics.
The Jefferson squat, on the other hand, is primarily an accessory lift that is best suited for advanced lifers. This exercise requires decent lower body mobility to perform correctly and comes with a steep learning curve. So, to answer the question, the Jefferson squat is not better than the conventional barbell squat.
How is the Jefferson squat different from the Jefferson deadlift?
Although both these exercises might look the same to an untrained eye, they focus on different muscle groups and involve unique lines of pull. The Jefferson squat involves lifting a barbell straight between your legs by extending and flexing your knees and hips. On the flip side, the deadlift variation of this exercise involves hip flexion and extension to lift the bar. The bar in the Jefferson deadlift moves in a slight arc.
Furthermore, your torso will be at a slight angle while doing the Jefferson squat, whereas your shoulders must be square and facing the wall in front of you while performing the Jefferson deadlift. Your torso position will significantly impact how the exercises train your muscle groups.
When should I do the Jefferson squat in my workout?
The Jefferson squat is an accessory lift that should be used to fix muscle and strength imbalances. You should save the Jefferson exercises for later in the workout. Doing them early on will fatigue your muscles, which can hamper your performance on exercises like the squat and lower-body-focused deadlifts.
Since the Jefferson squat involves lifting relatively light weights, you must limit your rest duration between sets to 60 to 120 seconds. This will keep your training intensity high and induce hypertrophy.
Wrapping Up
The Jefferson squat is a unique (and underutilized exercise) that can help you build lower body strength, muscle mass, and mobility. However, you must master the movement pattern to make the most of this lift and target your muscles optimally. Seek a professional’s help to fast-track your progress and lower your risk of injury.
Use the Jefferson squat variations and alternatives listed in this article to break through plateaus, keep your workout program interesting, and train your lower body from different angles to ensure overall development. Best of luck!
References
Fitness Volt is committed to providing our readers with science-based information. We use only credible and peer-reviewed sources to support the information we share in our articles.
- Schoenfeld BJ, Grgic J, Van Every DW, Plotkin DL. Loading Recommendations for Muscle Strength, Hypertrophy, and Local Endurance: A Re-Examination of the Repetition Continuum. Sports (Basel). 2021 Feb 22;9(2):32. doi: 10.3390/sports9020032. PMID: 33671664; PMCID: PMC7927075.
- Pallarés JG, Hernández-Belmonte A, Martínez-Cava A, Vetrovsky T, Steffl M, Courel-Ibáñez J. Effects of range of motion on resistance training adaptations: A systematic review and meta-analysis. Scand J Med Sci Sports. 2021 Oct;31(10):1866-1881. doi: 10.1111/sms.14006. Epub 2021 Jul 5. PMID: 34170576.
Interested in measuring your progress? Check out our strength standards for Jefferson Squat, Box Squat, Dumbbell Front Squat, and more exercises.